Wednesday, December 30, 2009

Crock Pot Black-eyed Pea Soup

Last August, when I turned the kitchen into a cannery, we ate a lot of salads and sandwiches. In December, I made the kitchen over into a bakery, and routinely employed the crock pot for preparing our meals.

I had never used a crock pot until about 4 years ago. Pritchard Parker used to cringe when he saw me pulling the thing out and I admit I did make some pretty horrific concoctions with it. I have always tried to learn from my failures in the kitchen and thus I learned how to use the crock pot. Some things I learned are: you don't have to use nearly as much, if any, liquid as conventional cooking; less seasoning is needed; if you use a can of "cream of" soup, your finished product will be ugly; the simpler the better. In the few next days, I shall share some of my successes with the crock pot.

Black-eyed Pea Soup
1 pound dry black-eyed peas
1 large onion, diced
3-4 stalks celery, sliced
3-4 medium potatoes, peeled (if needed), cut into chunks
4 slices bacon
2 cans Ro*Tel diced tomatoes and green chilis
Salt and freshly ground black pepper, to taste

Inspect peas for any small stones or other foreign debris. Place peas in a colander and rinse very thoroughly in hot water. Drain, then place peas into the crock pot. Cover with water to about an inch over the top of the peas. Cook on low for 3 to 4 hours.

Cook the bacon, in a large skillet, until crisp, then drain on paper towels. In the pan drippings, fry the onions, celery, and potatoes over medium high heat until beginning to brown. Once the black-eyed peas are tender, add the potato mixture to the crock pot along with the bacon.

Add the Ro*Tel tomatoes and salt and pepper, to taste, to the crock pot. Cover and cook on low for 4 to 5 hours.

Sunday, December 27, 2009

Sweet and Hot Glazed Pecans


It's hard to stop eating these sweet and hot nuts, once you get started. I consider these the Piece de resistance of my Christmas baking season. You can call them pi khans, pi cans, pee khans, or pee cans, even us Southerners can't agree on that one. Whatever you want to call them, it wouldn't be Christmas for me without lots of pecans.

Sweet and Hot Glazed Pecans
1 cup sugar
1/3 cup water
2 tsp. salt
1 tsp. cayenne pepper
4 cups pecan halves

Preheat oven to 350 degrees. Butter a large, heavy cookie sheet. In a large saucepan, over medium heat, combine the sugar, water, salt, and cayenne pepper. Stir until sugar dissolves and mixture comes to a boil. Boil 2 minutes. Remove from heat, add pecans and stir until they are coated with the mixture. Spread evenly onto the prepared pan. Bake until pecans are just starting to brown, 12 to 15 minutes.

Transfer to parchment paper, wax paper, or brown paper, (not paper towels - they will stick) and separate the pecans. Cool completely.

Friday, December 25, 2009

Wednesday, December 23, 2009

My Ideal Chocolate Chip Cookie


This is a perfect cookie, in my opinion. They are so pretty with their crackled tops. If you eat around the edges, you'll find them to be crunchy and crisp, then when you get to the center they become chewy. A sweet treat filled with bittersweet chocolate.

A heavy-duty stand mixer, which I do not have, would greatly ease the preparation of this cookie, as it is a very dense dough. It just takes me a little longer to make my cookies, while I work in all the flour by hand--sometimes literally by (clean) hand. An old-timey tip, from the days when all cooks made their cookies the way I do, is to sift your flour before measuring.

Chocolate Chip Cookies
1 cup butter, room temperature
1 cup sugar
1 cup light brown sugar, packed
2 eggs
2 tsp. vanilla
3 cups flour
1 tsp. baking soda
2 tsp. hot water
1/2 tsp. salt
2 cups bittersweet chocolate chips

Preheat oven to 350 degrees and line baking pans with parchment.

Cream together butter and both sugars until smooth and creamy. Beat in eggs, one at a time, then stir in the vanilla. Dissolve the baking soda in hot water and stir that in, as well as the salt. Stir in the flour and chocolate chips. The dough will be very thick.

Form dough into walnut size balls; place on the baking pan and flatten slightly. Bake for about 10 minutes, rotating pans half way through baking, until edges are beginning to brown. Remove to racks to cool.

Tuesday, December 22, 2009

Sand Tarts

We know this lovely cookie by many names--Mexican Wedding Cookies, Russian Teacakes, Snowballs, and more. Often they are crescent shaped, sometimes flattened into discs. I have seen them made with cinnamon sugar rather than confectioner's sugar and walnuts, not pecans. Also, I've have seen them sprinkled, or dusted with sugar, rather than being completely immersed like I make them.

I came to know them, as a girl, as Sand Tarts. I don't recall my Mother or any of the other bakers of the family making them but some of my friends' mothers did and I fell in love with this cookie.

This recipe is in my handwriting as a 17 year old, which was, ahem, quite a few years ago. I still bring it out every Christmas and I have never tried another variation on this cookie. They are melt-in-your-mouth delicious!


Monday, December 21, 2009

German Chocolate Cake


Today is the Winter Solstice, the shortest day of the year, and my husband's birthday. Happy Birthday Pritchard Parker! Several years ago, he mentioned, nonchalantly, one day that German Chocolate is his favorite cake. It is? I was so surprised to learn this. How had I gone all those years without knowing it? Had he had a slice at work that day, and just declared it his favorite? I don't know, but I sure filed the information away for future reference.

Today, was a good day to bring forth that tidbit of knowledge, take a break from cookie baking, and bake my husband a German Chocolate Birthday Cake.

German Chocolate Cake
2 1/4 cups all purpose flour
1 1/2 cups sugar
1 1/2 tsp. baking soda
1/4 tsp. salt
1 cup butter, room temperature
1 cup sour cream
4 eggs
4 oz. sweet baker's chocolate, melted
1/2 cup milk
3/4 tsp. vanilla

Combine all ingredients in a large mixing bowl and beat with an electric mixer, on low speed, until blended. Increase speed to high and beat for an additional 2 minutes. Pour batter evenly into two 8" or 9" cake pans, which have been greased and floured. Place into a preheated 350 degree oven for about 35 minutes, until a toothpick inserted into center comes out clean. Remove cakes to wire racks to cool.

German Chocolate Icing
3/4 cup evaporated milk
1/2 cup light brown sugar
1/2 cup butter
1 1/2 cups shredded coconut
1 cup peans, roasted, chopped

In a saucepan set over medium heat, bring milk, butter, and brown sugar to a full boil. Remove from heat and stir in coconut and pecans.

When both the cake and the icing are completely cool, place one cake layer on a cake plate. Spread half the icing onto the layer. Top with remaining cake layer and icing.


Friday, December 18, 2009

Pecan Tartlets

This cookie was a little prissy and time consuming to make, though straight forward and simple. I started by buttering my 3-inch tartlet tins with a small pastry brush, which felt rather like painting ornaments. I'm quite sure many people could have finished the job in less time but I tend to obsesses over such small details.


Pecan Tartlets
2 cups unbleached white flour
2 (3 oz.) packages cream cheese, room temperature
1 cup butter, room temperature
6 Tbsp. sugar
1 tsp. vanilla
1 egg white
1/4 cup brown sugar
1/2 cup chopped pecans


For pastry, cream together butter and cream cheese; add 6 Tbsp. sugar and beat to blend well. Mix in the flour. Form into 1-inch balls using floured hands. Flatten each ball into one of the buttered tartlet tins. Press an indention into each one for filling.


For filling, mix together the brown sugar, chopped pecans, and egg white until well blended. Put 1 tsp. filling mixture into each tartlet.


Bake at 350 degrees for 17 - 20 minutes, until tartlets are golden brown around the edges, rotating the pans half way through baking. Cool completely before removing from tins.


Classic Peanut Butter Cookies

This is my favorite cookie. There, I've said it. I couldn't possibly go through a cookie baking marathon without it. It is usually one of my first to bake and I will bake several batches throughout the season. It is also a very flexible cookie lending itself to all kinds of add-ins. . .chocolate, oatmeal, candy, raisins, and more. It makes a great ice cream sandwich or you could make peanut butter and jelly sandwiches with them.

As I was arranging a few cookies on a plate to photograph, I started wondering about those criss-cross fork marks. I love them and find them soothing to make, they identify the cookie, and I have never seen them on any other other. But why, and who did it first? There are any number of things that can be used to flatten a cookie. I even found myself fantasizing about the baby's hands but Pritchard Parker said that would be creepy. Besides she's too little; she would grasp rather than press, then she would have peanut butter, raw egg, and sugar on her little hands, which would go straight to the mouth. Maybe next year.

This is the last cookie I'm sending to Susan of Food Blogga for her 3rd annual Christmas Cookie Event. Check out the amazing array of beautiful and unique cookies from all over the world she has posted

Peanut Butter Cookies
The Moosewood Restaurant Book of Desserts

1 cup peanut butter
1 cup butter, at room temperature
2 cups packed brown sugar
2 eggs
2 teaspoons vanilla
3 cups unbleached white flour
1/2 tsp. salt
1 tsp. baking soda
1 tsp. baking powder

Cream together the peanut butter, butter, and brown sugar until light and well blended. Beat in the eggs, one at a time. Stir in the vanilla. Sift together the flour, salt, baking soda, and baking powder. Gently fold the dry ingredients into the wet ingredients.

Roll spoonfuls of dough between your palms to form 2-inch balls, and place them about two inches apart on parchment lined baking sheets. Press each cookie with the tines of a fork to create the criss-cross pattern.

Bake for 10 minutes at 350 degrees. Transfer cookies to a rack to cool. This recipe makes about 4 dozen 3-inch cookies.

Thursday, December 17, 2009

White Trash

No, not that white trash. Not the class of people with very little in the way of pride, no manners to speak of, and hardly any respect for anybody or anything. I'm talking about this delicious snack mix I like to fool myself into thinking is healthful. After all, the cereal box boldly claims, in a very large typeface, that it is A GOOD SOURCE OF CALCIUM AND VITAMIN D, failing to mention, of course, that is after you add milk. And is has nuts and raisins and everyone knows those are nutritious, right? Well, I only make it at Christmas.

White Trash
12 oz. box Golden Graham cereal
16 oz. peanuts or mixed nuts
1 cup raisins
12 oz. semi-sweet chocolate chips
1 cup peanut butter
1 box confectioners' sugar

Mix cereal, nuts, and raisins. Melt together the chocolate and peanut butter and pour over the cereal mixture. Put into a paper bag with the confectioners' sugar and shake to coat well.

Monday, December 14, 2009

Chocolate Orange Cookies

I love this recipe! The cookies are easy to make, fancy to look at, and delicious to eat, with their combination of orange flavor and bittersweet chocolate. Very festive. Very Christmas-y.

Last year, after Christmas, I discovered the blog, LivingTastefully . Eileen has some lovely cookie recipes and I made a note in my file to go back to her blog for ideas this Christmas cookie baking season. These Chocolate Orange Cookies won a recipe contest for the author who attributes the recipe to the Kosta Guest House in Sweeden.

I am sending this recipe to Susan over at Food Blogga for her 3rd annual Eat Christmas Cookies event. Check out the delicious entries she has posted so far.

Chocolate Orange Cookies
1 cup unsalted butter, softened
1 cup sugar
1 egg yolk
3 tsp. grated orange peel
2 cups flour
1/4 cup orange marmalade
6 oz. bittersweet chocolate, chopped
4 Tbsp. butter

Beat butter in a large mixing bowl until light and fluffy. Add sugar and beat until combined. Beat in egg yolk and orange peel. Slowly beat in the flour.

On a lightly floured surface, roll the dough 1/8 - 1/4 inch thick. Use a small, round cookie cutter, cut out the cookies and place on a parchment lined baking sheet. Make an indention in the center of each one, and fill with about 1/4 tsp. marmalade.

Bake in a 375 degree oven for 8 to 12 minutes, depending on thickness, until edges are lightly browned. Place on wire racks to cool completely.

In a double boiler, set over simmering water, melt together the butter and chocolate, and stir until smooth. Dip half of each cookie into the chocolate and return to the cooling rack to set.

Friday, December 11, 2009

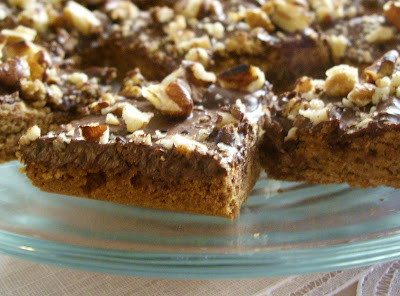
Toffee Bars

For a few days, I have been baking and baby-sitting but not blogging. I had forgotten how time consuming a 3 1/2 month old baby can be. And how delightfully charming they are.

This is a very old recipe which I see posted on blogs every now and then. It is often accompanied by engaging stories about it being a friend's aunt's recipe. Or a grandmother's. And I am sure it was, and it is also Betty Crocker's recipe, which is listed in the 1969 edition of the classic cookbook. I only recently found out that my own Grandmother's famous pumpkin pie recipe, which has been used in our family for 4 generations, is also Betty Crocker's.

This recipe is easy to make, even while taking care of a baby, tastes delicious, and it looks very pretty on a cookie tray.

Wednesday, December 2, 2009

Time for Christmas Cookies

Goodies Ready to be Packaged as Gifts - Christmas 2008

Last fall, even before the economy crashed, and some time before I lost my job, I decided I was going to give food to everyone on my Christmas gift list. For a number of reasons. I wouldn't have to waste time in traffic to go to the mall, or worse yet, the BoxMart. I didn't have to worry about sizes, styles, or color preferences. I didn't have to concern myself with whether a recipient would have the space (or desire) to display or store my gift. Everyone eats. And most of all it is a way to share something I love with people I love.

The first day Pritchard Parker came home from work, last December, to freshly baked cookies, I told him to Eat Cookies! I had plans to make dozens and dozens and hundreds of cookies, so he should feel free to help himself throughout the season. Which he did and loved it.


Trays of Cookies to Share

Sunday, November 29, 2009

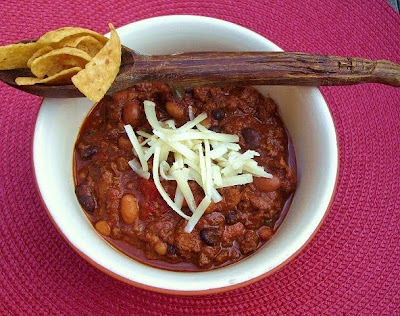
The Best Chili You Will Ever Taste

Each year, I make Turkey Chili the Saturday after Thanksgiving. My Mother says she looks forward to it all year long. This year, I did not cook a turkey--gasp!--so I didn't have any leftover. But I did make chili.

This is a recipe I have adapted, only slightly, from recipezaar.com recipe #73166 by the same title. The person who submitted the recipe states that she doesn't know the origin of it. It is very unusual and complex in flavor and we love it. Sometimes I serve it with Fritos and cheddar cheese; other times sour cream and cornbread. I've served it over rice, and turned it into both nachos and tamale pie.

The Best Chili You Will Ever Taste
2 tsp. olive oil
2 onions, chopped
1 lb. ground sirloin
3/4 lb. cubed sirloin
One 14 1/2 oz. can diced tomatoes
12 oz. dark beer
1 cup strong coffee
12 oz. tomato paste
1 can beef broth
3 cloves garlic, minced
2 Tbsp. brown sugar
1/4 cup chili sauce
1 Tbsp. cumin
1 Tbsp. cocoa
1 tsp. oregano
1 tsp. cayenne
1 tsp. corriander
1 tsp. salt
4 chili peppers, chopped
3 cans beans, such as kidney, black, pinto, rinsed and drained

Heat oil in large heavy pot and brown the meat and onions very well. Add the tomatoes, beer, coffee, tomato paste, and beef broth and stir until well blended. Add the sugar, garlic, spices, and peppers. Reduce heat and simmer for 1 1/2 hours. Add the beans and simmer for 30 minutes more.

Thursday, November 26, 2009

The Southern Relish Tray

The finishing touch on our Southern Thanksgiving table has always been the Relish Tray. Traditionally, it would be served on divided, cut glass trays and include a variety of pickles. In our family we love the fresh crunch of raw vegetables such as carrots, green onions, radishes, and celery (shown here stuffed with pimiento cheese) to cleanse the palate and offset the richness of the other dishes.

Tuesday, November 24, 2009

Bacon Roasted Brussels Sprouts and Apples

Here is a recipe from the November, 2005 Everyday Food magazine. This delicious recipe first appeared on my Thanksgiving that year and every year since. I've also made it several other times over the years. I really like it!

Bacon Roasted Brussels Sprouts and Apples
4 slices bacon, cut into 1/2 inch pieces
4 pints brussels sprouts, ends trimmed, and halved
coarse salt and freshly ground black pepper
1 apple, cored and sliced
2 tsp. red wine vinegar

Arrange bacon in a single layer on a large, rimmed baking sheet. Bake at 425 degrees until done, about 10 minutes. Add brussels sprouts in a single layer and sprinkle with salt and pepper. Roast until they begin to brown, about 15 minutes.

Remove from oven and toss in apple slices. Return to oven and roast until brussels sprouts are browned and tender and apple slices are tender, about 10 minutes more. Toss with vinegar and serve.

Monday, November 23, 2009

Stuffing or Dressing? How about Stuffed Dressing


The same questions arise every Thanksgiving. . .yams or sweet potatoes and stuffing or dressing. The answers are easy if you want to get technical, but let's not. When families come together for a bountiful meal, whether they call it stuffing and yams, or dressing and sweet potatoes, may they be blessed and enjoy. For the record, I am in the latter group.

I was surveying my kitchen inventory recently, after we'd had a weekend visit from out-of-town family, planning uses for all the leftovers. I saw leftover cornbread, extra sandwich bread, and a few biscuits left from breakfast. As I thought of the sliced turkey, bought for sandwiches, left in the fridge, I had an aha! moment. I would make simple turkey and dressing.

Not knowing exactly how this was going to come together, I starting crumbling the cornbread, biscuits, and a few slices of sandwich bread into a large bowl. I sliced a few stalks of celery and chopped a large, sweet onion, then sauteed them in about 6 tablespoons of butter. I was visualizing as I was crumbling and chopping and it came to me what I would do.

I added the sauteed vegetables to the crumbled bread mixture, added a couple of beaten eggs, a can of chicken broth, a couple of teaspoons of poultry seasoning, along with some salt and pepper, plus some chopped parsley. I wished it were moister, so I added some milk until it was the very moist consistency I was looking for.

I put half the mixture in the bottom of a baking pan and topped it with sliced turkey. Over the turkey, I added a layer of cranberry sauce. Then I added the remainder of the dressing mixture and baked it in in a 375 degree oven for about 50 minutes, until it was firm and nicely browned.
I served it with extra cranberry sauce but gravy (or both) would also be good. It was while I was eating it that I came up with the name for it--Stuffed Dressing. Pritchard Parker said, Mmmm!!

Sunday, November 22, 2009

Sunday Brunch: Shrimp and Grits


By now, everyone knows about shrimp and grits, right? The famous low country delicacy? The shrimp cooked in a bacon-y mushroom gravy and served over cheese grits? If not, you really should try it--you don't know what you've missed. Shrimp and Grits makes a very impressive and delicious brunch dish to serve all your guests on special ocassions.
This is the recipe of gifted chef and resturanteur, Chef Bill Neal (1950 - 1991) from Crook's Corner Restaurant, in Chapel Hill, North Carolina. This is the best recipe for the dish I have ever eaten at any restaurant, or cooked at home. There is a long list of ingredients (it is a complex dish) but it comes together quickly, once you have everything assembled and prepped.
So go ahead, start frying that bacon, squeezing some lemons, grating cheese, slicing mushrooms, and peeling those shrimp, it really is a delicious combination of flavors.
Bill Neal's Shrimp and Grits
2 cups water
One 14 1/2 oz. can chicken broth
3/4 cup half and half
1 cup stone ground grits
3/4 cup sharp cheddar cheese, grated
1/4 cup parmesan cheese, grated
2 Tbsp. butter
1/2 tsp. Tabasco sauce
1/4 tsp. white pepper
3 slices bacon
1 lb. medium shrimp, peeled and deveined
1/4 tsp. black pepper
1/8 tsp. salt
1/4 cup flour
1 cup sliced mushrooms
1/2 cup scallions, sliced
2 cloves garlic, minced
1/2 cup chicken broth
2 Tbsp. freshly squeezed lemon juice
1/4 tsp. Tabasco sauce
lemon wedges

Bring first 4 ingredients to a boil, in a medium saucepan. Gradually whisk in grits; reduce to simmer, stirring occasionally, until thickened, according to time on package. When the grits are done, stir in the cheddar cheese and next 4 ingredients, stirring until cheeses are melted. Cover and set aside, but keep warm.
While the grits are cooking, fry in bacon in a large skillet, until crisp. Set aside on paper towel and reserve 1 Tbsp. drippings in skillet. Sprinkle the shrimp with salt and pepper, dredge in flour, and set aside.
In the bacon drippings, saute the mushrooms about 5 minutes, or until tender. Add the scallions and cook for 2 more minutes. Add the shrimp and cook for 2 minutes, until the shrimp begin to brown. Stir in the chicken broth, lemon juice, and hot sauce, and continue to cook 2 more minutes, stirring to loosen brown bits from skillet.
Divide the grits into 4 large, shallow bowls, ladle the shrimp mixture over the grits, and top each with crumbled bacon. Serve with lemon wedges.

Wednesday, November 18, 2009

Eastern North Carolina Barbecue Sauce

I almost always have a batch of the hot and sharp Eastern North Carolina barbeque sauce on hand because my husband loves it so much. It is best served with smoked pulled pork, of course, the traditional way, but it also enhances other meats, including the pork loin I recently oven roasted.

Eastern North Carolina Barbeque Sauce
2 cups apple cider vinegar
1 Tbsp. brown sugar
1 tsp. (up to 1 Tbsp.) cayenne pepper
1 Tbsp. hot pepper sauce such as Tabasco or Texas Pete
1 tsp. salt
1 tsp. ground black pepper

Mix all ingredients together in a jar with a tight fitting lid. Shake very well to combine, then refrigerate for at least 24 hours before using, shaking every now and then.

Tuesday, November 17, 2009

Carrots

Carrots are a subject I'm afraid I could go on and on about half the day, or maybe longer. I am a fan of the carrot, as anyone who knows me can attest. I like raw, unadorned carrots to munch on. I like raw carrots in garden salads and in salads such as carrot-raisin and copper pennies--remember those? I like to use them in all kinds of soups and to add sweetness and nutrition in pasta sauces. Carrot cake, cream of carrot soup, carrot souffle, carrot chutney, you get the picture.

I am not going to say anything about those little bags of "baby carrots", which are NOT any such thing, nor about that sickly white coating that forms on them. Anyone who cares to know the truth can easily find out. I love to peel carrots! I once went on a quest for the perfect carrot peeler. Peeling carrots is so soothing to me and I can, and have, stood and happily peeled 25 pounds at a time. I know 101 ways to chop, dice, and slice carrots.

I also like to look at carrots. I'm always drawn to the carrot motif on dishes and other objects. I have a few, shall I call them, carefully selected (or gifted) carrot icons? A few books, a mouse pad, a paperweight, a spoon rest, a mug, a pair of wooden salad servers with carved carrots for handles. Not so much as to be kitschy. A casual acquaintance or visitor in my home would never notice.


Glazed Carrots
(adapted from a Alex Guarnaschelli recipe)

2 Tbsp. olive oil
1 lb. thin, young carrots, with tops if possible
Salt and freshly ground black pepper to taste
2 Tbsp. dark brown sugar
1 Tbsp. molasses
1/2 cup to 1 cup water
2 Tbsp. butter
1 sprig rosemary

Cut off the carrot tops and reserve a few sprigs, which have a parsley-like flavor, for garnish if desired. (Buying carrots with tops assures their freshness.) Half or quarter the carrots, lengthwise, if necessary to have them a similar size.

Heat the olive oil in a large skillet. Add the carrots, salt and pepper. Stir the carrots around to coat them well. Add the brown sugar and molasses and stir to melt and coat the carrots. Add some water and cook, uncovered, for 5 to 8 minutes, until the carrots are just tender, adding more water if necessary. As the water reduces, a syrup will form.

When the carrots are tender, add the rosemary sprig and butter. When the butter is melted, remove and discard the rosemary sprig. Garnish with chopped carrot tops.


A carrot-bunny paper weight my daughter gave me for Mother's Day a few years ago. Talk about "you are what you eat"!

This little cutie is only about 3 inches long and very handy to keep my papers put.


A dear friend sent me this postcard years ago from her vacation but I don't remember where she was. Wherever it was, she was browsing in a shop and spotted a series of Swiss Fantasy postcards, circa 1917, reprinted, of course. This one is called "Romeo Carrot".


On the postcard she wrote,

R----
Of course my thoughts turned to you upon seeing the carrot romancing the woman. The card was certainly meant for you.
Love, S----

Friday, November 13, 2009

Baked Cabbage and Apples

This is a super simple and delicious side dish. I've made it many, many times, and people always enjoy it. Its Autumnal flavors can be modified endlessly. If you use a tart apple, such as Granny Smith, you may want to use some kind of sweetener -- sugar, brown sugar, honey, maple syrup. This time, I used Honey Crisp apples that were plenty sweet, so I didn't add anything sweeter. You could also add cinnamon and/or nutmeg, but I never do. I have used dashes of cayenne pepper, however.


Baked Cabbage and Apples
1 small head cabbage, coarsely chopped
1 or 2 apples, depending on size, sliced
1/4 cup brown sugar (optional)
1 cup dried bread crumbs (store bought work fine)
1/2 cup melted butter


Plunge the chopped cabbage into boiling water for 5 minutes only. Drain very well. Place one third of the cabbage into a 2 quart baking dish. Top with half the apples and sprinkle with sugar if using, then bread crumbs. Repeat layers, ending with cabbage, then a layer of bread crumbs. Pour melted butter all over. Cover and bake at 350 degrees for 30 minutes. Remove cover and bake for another 15 minutes.


Thursday, November 12, 2009

Borscht


I am no authority on Borscht, don't have Russian or Ukraine ancestry, have never seen it being made, in fact, I've never even eaten the soup except when I've made it. I did once see a co-worker eating it for lunch in the breakroom, but that is as close as I have gotten to it, other than my own. But we love beets and I find making soup very soothing and comforting when the weather is bad like it was when I made this one. We had three straight days of rain from the storm named Ida, and it was very gloomy.

I believe the real deal Borscht should be started with beef bones but I find that a little disconcerting, so I use already butchered stew beef. Roasting the beets and carrots, before adding to the soup makes them incredibly sweet.

If anyone has any advice or tips for making this soup more authentic, I welcome your comments.


Borscht
1 lb. beef stew meat in bite size pieces
1 - 1 1/2 quarts beef broth
1 large onion, coarsely chopped
2 stalks celery, sliced
3 - 4 plump cloves garlic, minced
1 large russet potato, peeled and cubed
4 large beets
4 carrots
1 small head cabbage, sliced
16 oz. can diced tomatoes with juice
3 Tbsp. red wine vinegar
1/2 cup chopped, fresh dill
Salt and freshly ground pepper to taste
Olive oil for cooking
Sour cream for garnish

Heat a little olive oil in a large soup pot, then sear and brown the beef cubes on all sides very well. Remove from pan and set aside. Add a little more oil if needed and cook the onions until they are beginning to turn golden, stirring often. Add the celery, garlic, and potatoes, cooking and stirring a few more minutes. Add 1 quart beef broth, cover and simmer until the beef is tender, about 1 1/2 hours.

Meanwhile, roast the beets and carrots. Scrub the beets well with a vetable brush. Peel the carrots. Make 2 foil packets, add the vegetables, separately to each, drizzle with a little olive oil, then salt and pepper, to taste. Seal the packets, place them on a sheet pan, then into a 400 degree over for about an hour.


Slice the cabbage and add to the pot along with the tomatoes and vinegar. Cook for about 10 minutes, until the cabbage is tender. Peel and slice the beets, slice the carrots, and add them in. Add more beef broth if needed. Cook for an additional 10 minutes, stir in the dill, and serve with a dollop of sour cream.

Sunday, November 8, 2009

Cook and Tell Vintage Recipe Redux


When I read, on Serious Eats this week, about the Weekend Cook and Tell calling for vintage recipes from the 1960's I immediately thought of a book in my collection. It's a church cookbook, published in 1967, from my home town of Opelika, Alabama.

I have always been fascinated (and a little grossed out) by the salad section of this book--lots of congealed concoctions and aspics, lots of mayonnaise, odd combining of flavors. One recipe has lime jello, pickle relish, canned peach slices, and celery!


One very popular ingredient, in this salad chapter, is Durkee Sauce. I was vaguely aware of such an item but had never had it before and wasn't really sure it was still available. Was I ever surprised when I did an internet search. This stuff is alive and well! I saw it described in a Chow Hound article as, "An American Cult Classic since 1857".

If you can't find it locally, don't worry, there are plenty of copy-cat recipes available. Or you can order it by the case at Amazon.

My grocery store did have the "famous sauce" and I am reporting that I have now purchased my first and last jar.

The cook and tell retro challenge gave me a perfect excuse to try one of these oddball recipes. I chose a recipe called, Vegetable Salad. I really did have hope for it with its canned asparagus and canned peas, because it also had fresh green bell pepper, celery, onion, and cream cheese. The Durkee sauce has an odd mustardy flavor that ruined the recipe, in my opinion, as well as my husband's. In fact, he tried to warn me away from it before I even bought it. Sometimes I just won't listen!

I am not elaborating on the recipe because I really don't recommend that you try it. But if you really, really, want to and can't read the recipe above, just email me and I'll gladly send you the recipe. Along with the rest of the salad.

1967 Vegetable Salad

Friday, October 30, 2009

Candy Roaster Pie


As I contemplated candy roaster pie, and talked to people who've eaten it, I knew I would not use brown sugar, cinnamon, and other pumpkin pie spices, because I didn't want it to taste like pumpkin pie.

I was given a recipe calling for lemon extract, which intrigued me. Having never used, in all my zillion years of cooking, lemon extract, I was thinking about lemon juice/zest and how much to use. Then I thought of the mountain women, of a bygone era, making pies with these beautiful squash and it dawned on me that they probably did not have access to fresh lemons. Which is why they used lemon extract. And they would have gotten it from the Watkins man. I decided to go with that.


Candy Roaster Pie
2 cups candy roaster puree
3/4 cup sugar, separated
2 eggs, separated
2 Tbsp. flour
1/2 cup evaporated milk
1 tsp. vanilla
1 tsp. lemon extract
3 Tbsp. melted butter
1 unbaked pie crust

Mix together flour and 1/2 cup of the sugar. Beat together egg yolks and milk. Stir sugar mixture into egg mixture, then flavorings and butter. Beat well and pour into unbaked pie crust. Bake in preheated 350 degree oven until set, about 45-55 minutes.

Meanwhile beat the egg whites until stiff, then beat in the remaining 1/4 cup sugar. When the pie has set, remove from oven and spread the meringue over it; return to the oven and bake until browned, about 5-8 minutes.


Candy Roaster Squash Pie

Thursday, October 29, 2009

Candy Roaster Squash


Ever since I have lived in these mountains, almost 20 years, I've heard of the legendary Candy Roaster Squash. First from my husband and his family, who have lived here for generations. Also, over the years, many other native people. Everyone has talked longingly, as of a long lost treasure.

Unbeknownst to me, on a farmers market excursion, while I was enjoying the sunny, crisp day, and marveling at the variety and quantites of the pumpkins, squash, and gourds, and snapping photos of them, I took a picture of a bin of candy roasters. I didn't know. I can't possibly show Pritchard Parker every photograph I take, so he didn't know either. I just thought they were kooky looking things.

Several days later, when we were at the market together, and driving by the vendor with these squash, Pritchard Parker exclaimed excitedly, "They have candy roasters!", and slammed on brakes.


These rare heirloom squashes are huge, weighing up to 60 pounds. This one is about 14 pounds.


The pink skin of the candy roaster opens to a pretty golden orange flesh. I was surprised by the smell of it, almost cucumber-like.

After roasting the squash, I have puree which is very delicately flavored, much less stringy than pumpkin, and very juicy, for pie making.
Stay tuned. . .

Candy Roaster Squash on Foodista