Showing posts with label Baking. Show all posts

Wednesday, January 6, 2016

Children's Christmas Cookies


 HAPPY NEW YEAR!! I hope you have been enjoying your holidays. We sure have.

We actually still are. Have you taken down your Christmas Tree and put away your decorations? We haven't. In my world, the first day of Christmas is Christmas Eve (not the day after Thanksgiving). And the 12th day of Christmas is January 5th. Today is Epiphany and marks the day the wise men met the Christ child and bestowed Him with gifts of gold, frankincense, and myrrh. After today, my Christmas season will be over.

I finally got my camera back from the shop and what is the first thing I photographed? Christmas Cookies. My camera had to have its aperture control unit replaced (for the second time) and I have only had it for two years. Meanwhile, it went on quite an adventure--two local places, then on to Arizona, then Connecticut, and finally back home. It now seems perky, clean, and ready to go.


(Phone photo)

Once our favorite girl was out of school for the holidays, she came and spent a few days with us so we could bake cookies. The first one was a basic sugar cookie. She did all the measuring and mixing, I just supervised. While the dough was mixing, we made a mixture of sugar and red sprinkles to roll them in.. I scooped out the dough, then she rolled it into balls and then into the sugar. Perfect job for little hands.

We made more cookies and goodies than what is shown here, but they have been eaten/given away by now.


She kept telling me she wanted to make shape cookies, so shape cookies it was. Once again, she measured and mixed and I supervised. We made a cookie dough which can be rolled out right away without needing to be chilled. We rolled it out on sheets of parchment (she is also getting quite accomplished with the rolling pin) and slipped the sheets onto the baking pan.

Easier cutting is achieved if the dough is chilled after it is rolled out. We just sat a pan of dough outside for a few minutes while we rolled out the next batch. Once the dough is chilled, it cuts beautifully, with sharp edges.

Shape Cookies
1 cup butter, softened
1 cup sugar
1 egg
1 tsp. vanilla
2 tsp. baking powder
1/2 tsp. salt
3 cups flour

Preheat oven to 350 degrees.

Beat butter and sugar until creamy. Beat in egg, vanilla, baking powder, and salt until well combined. Add flour, one cup at a time, mixing until combined after each addition.

Divide dough into thirds and roll onto a piece of parchment paper to about 1/4 inch thick. No need to flour the parchment, but you may need to lightly flour the rolling pin to avoid sticking. Slide the parchment onto a baking sheet and chill 20 to 30 minutes for easier cutting.

Cut into desired shapes right on the sheet pan, then peel away the excess dough, which can be re-rolled. Bake for 6 to 8 minutes. The cookies will remain blonde but be set. Let cool completely before removing from the trays and decorate as desired.


Peanut butter cookies are my personal favorite. Once again, I scooped and she rolled into balls and then into sugar for a little extra sweetness and sparkle. She had a little trouble with the crisscross fork marks and asked me to finish. I suspect she was over it and wanted to get back to her Barbies.

Peanut Butter Cookies
1 1/2 cups flour
1/2 tsp. baking soda
1/2 tsp. salt
1/2 cup butter, softened
1/2 cup peanut butter
1/2 cup sugar
1/2 cup brown sugar
1 egg
1 tsp. vanilla

Whisk together the flour, baking soda, and salt. Set aside.

Preheat oven to 375 degrees.

In mixing bowl, combine butter, peanut butter, sugar, brown sugar. Beat well until creamy. Add egg and vanilla and beat until well mixed.

Add flour and stir until combined.

Roll dough, by tablespoons, into balls, then roll in sugar. Place 2 inches apart on a parchment lined baking sheet. Flatten balls with a fork using a crisscross pattern.

Bake 10 - 12 minutes.


Wednesday, October 28, 2015

Sweet Potato Biscuits


AT THIS MOST GLORIOUS TIME OF YEAR, my camera had to go to the shop. Sigh.

Last week, I was on a retreat. I stayed in a lodge at a mountainside lake which was unbelievably beautiful with the peak of autumn color. The weather was perfect--chilly enough for sweaters, jackets, scarves, and gloves but not so cold as to need to bundle up. The sky each day was perfectly cloudless and mazarine.

I was feasting my eyes and every place I looked I saw something else I wanted to photograph. The food was delicious and I wanted to shoot that too. Fortunately, my cooking and photographing got ahead of my blogging, so I have some material to post for a while (while my poor camera is in the hospital).


I first learned of sweet potato biscuits from my beautiful aunt, my mother's sister. She makes the most delicious biscuits I have ever eaten. Hers are the standard to which I hold all other biscuits. The children of the family always called her "Aunt Biscuit".

For a special occasion we catered ourselves, she made sweet potato biscuits which she cut very small and served with ham. They were amazing and very popular. I recently tried my hand at them.


Sweet Potato Biscuits
3/4 cups flour
2 Tbsp. brown sugar
1 Tbsp. baking powder
1/2 tsp. baking soda
1 tsp. salt
6 Tbsp. chilled butter, cut into pieces
3/4 cup cold mashed sweet potatoes
1/3 cup buttermilk

In a large bowl, whisk together flour, brown sugar, baking powder, baking soda, and salt. Cut in butter until the mixture resembles coarse sand. In another bowl, stir together sweet potatoes and buttermilk. Pour into the flour mixture and combine until mixed.

Turn the dough onto a lightly floured surface and knead very gently until dough comes together but is still lumpy. Shape into a disk and pat into 1-inch thickness. Cut with a floured biscuit cutter.

Place biscuits on a buttered sheet pan, arranging them close together. Brush the tops with melted butter and bake at 425 degrees for 20 to 25 minutes until golden.


Wednesday, April 22, 2015

Carrot Cupcakes with Pineapple and Golden Raisins topped with Cream Cheese Frosting


I was asked to bring a healthy dessert for a meeting. Is that an oxymoron?

My habit of over thinking things had me wondering. Isn't dessert the final course of a meal? Wouldn't healthy dessert be the quintessential fruit and nuts?


I knew this group wanted a treat, a goody and not a tray of fruit and nuts. I started thinking about my longstanding desire to include at least some nutritional value in the sweets I make--fruit pies, oatmeal cookies, rice pudding, parfaits. (This is not to be confused with celebrations. . .birthday cakes, Christmas cookies).


Personally, I am not a sweetie. Even as a child, I always preferred savory tastes. But I do love to cook and bake. And I love seeing people appreciating my efforts. These cupcakes made the group very happy and that made me happy.

Another way to steer sweets towards a healthier horizon is through portion control; thus the cupcakes rather than an entire cake.


Carrot Cupcakes with Pineapple and Golden Raisins
2 cups flour
1 1/2 cups sugar
2 tsp. baking powder
1 tsp. salt
1 tsp. cinnamon
1 (3 oz.) package cream cheese, room temperature
2 Tbsp. sugar
1 egg yolk
Pinch of salt
1/4 cup finely chopped pineapple
4 eggs, room temperature
3 cups finely shredded carrots (about 6 medium)
3/4 cup vegetable oil
1 tsp. vanilla
1/2 cup golden raisins

Line 24 muffin cups with paper cupcake liners. Preheat oven to 350 degrees.

In a large bowl stir together the flour, 1 1/2 cups sugar, baking powder, 1 tsp. salt, and the cinnamon. Set aside.

For the filling, in a mixer bowl combine cream cheese and 2 Tbsp. sugar. Beat with and electric mixer on medium speed until combined. Beat in the egg yolk and a pinch of salt. Fold in the pineapple. Set aside.

In another bowl stir together 4 eggs, the carrots, oil, and vanilla.

Add carrot mixture to flour mixture and stir until combined. Fold in golden raisins.

Spoon about 1 tablespoon of the batter into each muffin cup. Drop about 1 rounded teaspoon of the cream cheese mixture into each muffin cup. Spoon the remaining batter over cream cheese mixture in cups.

Bake for 15 - 20 minutes or until a toothpick inserted in centers comes out clean. Cool cupcakes in muffin cups on wire racks for 5 minutes. Remove cupcakes from muffin pans and cool completely on wire racks.

Frost with Cream Cheese Frosting and store in refrigerator.

Cream Cheese Frosting
8 oz. cream cheese, softened
1/2 cup butter, softened
2 tsp. vanilla
5 1/2 cups powdered sugar

In a mixing bowl beat cream cheese, butter, and vanilla with an electric mixer on medium speed until light and fluffy. Gradually beat in powder sugar to reach desired spreading consistency.


Wednesday, February 25, 2015

Black Skillet Parker House Rolls


A VERY OLD-FASHIONED STYLE of bread, Parker House Rolls are soft, buttery, and slightly sweet. These rolls are unlike the rustic, crusty, dense, seedy, whole grain breads so popular today. I do love the artisan breads being created nowadays, but these fluffy rolls hit a comfort zone I needed to feel.


I usually find "talk about the weather" to be so dreary, boring, mundane. In ordinary conversation it seems  so redundant, but in relation to food it seems more pertinent. Cold weather equals warming food. And it has been cold! record-breakingly so, here in the mountains of western North Carolina.

I decided to make a beef stew and wanted bread to go with it.

I had recently had a couple comments on my blog from one of our fellow bloggers. To acknowledge and respect,  I visited her blog. That is where I got the idea for these rolls. You just never know where inspiration will come from do you?

The recipe made 2 dozen rolls for me. I baked the first dozen, then covered the remaining dough and refrigerated it overnight. The next day, I took the dough out and let it sit at room temperature for about an hour. Then I kneaded it down a bit and formed another dozen rolls and let them rise an additional 2 hours. I must say, the rolls were much more delicious the second day and in my experience working with yeast breads, it should never be rushed. Allow plenty of time for resting and rising.


Black Skillet Parker House Rolls
(adapted from My Catholic Kitchen)
1/2 cup warm water
1 cup warm milk
1/2 cup honey
1 packet yeast
1/2 cup (1 stick) butter, softened
1 1/2 tsp salt
5 - 6 cups flour

Combine the warm water, milk, honey, and yeast and set aside for about 10 minutes.

In a stand mixer with a dough hook, combine the yeast mixture, butter, salt, and 5 cups of flour. Mix and knead, adding more flour until the dough leaves the sides of the bowl and clings to the dough hook, about 5 minutes.

Transfer the dough to a floured surface and knead a few times. Pinch off balls of dough and form into rolls, pinching the seams on the underside to make a smooth top. Place the formed rolls into a well buttered cast iron skillet, leaving space between each one. Let the rolls rise in a warm place  for 2 hours, until doubled in size. Bake for 20 minutes at 375 degrees. Brush generously with butter and serve piping hot.


Wednesday, January 21, 2015

Cheesy Garlic Butter and Angel Biscuits


OUR RESIDENT FIVE-YEAR-OLD, loves helping me in the kitchen. She especially likes baking. Because she was out of school Monday, for Martin Luther King Day, I thought it would be a perfect day to make a batch of Angel Biscuits. We were having a Tomato Soup for dinner and I thought the biscuits would be delicious with it.

Especially with the Cheesy Garlic Butter we made. My blogging friend Melynda, from Our Sunday Cafe, recently posted a recipe which originated in a now closed but once popular restaurant in Portland, Oregon. I adapted the recipe to our tastes.

We have eaten all the biscuits, but we still have some of the cheesy garlic butter. Tonight, we will be having some on French Bread.


Cheesy Garlic Butter
1 cup (2 sticks) salted butter
8 oz. extra sharp cheddar cheese, freshly grated
1 clove garlic, minced
1/4 tsp. (more to taste) cayenne pepper

Have cheese and butter at room temperature. Beat all ingredients with a mixer, beginning at low speed and increasing speed, until the mixture is light and fluffy.


Angel Biscuits
2 1/2 cups all purpose flour
2 Tbsp. sugar
1/2 tsp. baking powder
1/2 tsp. salt
1/2 cup shortening
1 packet yeast, dissolved in 1/4 cup warm water
3/4 cup warm buttermilk

Combine all dry ingredients in a large bowl. Cut in shortening until the mixture resembles coarse crumbs. Add yeast mixture and buttermilk; stir to combine. Turn onto a floured surface and fold the dough over itself a few times until all is blended.

Roll out to 3/4 inch thickness, then cut into 2 1/2 inch biscuits. Place biscuits on a baking pan which has been spritzed with cooking spray. Cover and let rise for about 45 minutes.

Bake at 400 degrees for 15-20 minutes until done.

Note: Some cooks skip the rising step and put the biscuits directly into the oven after placing them in the pan. My grandfather could have done it that way, I don't know. I do know from experience, if you let yeast dough have plenty of time to rest and rise, you will be richly rewarded.


Friday, December 19, 2014

Saltine Cracker Toffee Bark


SEVERAL YEARS AGO, A WOMAN AT MY OFFICE brought in a plate of these tasty treats to share. She called them "Mock Heath Bars". I loved them and was amazed when she told me how she made them. . .with saltine crackers.

Mention the words, Heath Bars, and I am transported to happy memories from childhood. My Mother and her best friend loved those things. So many summer afternoons were spent swimming at the lake with Mama and her friend with her two daughters. On the way home, we would stop by the country store for ice cream--fudgcycles, drumsticks, sherbert push-ups, little cups of ice cream eaten with a wooden spoons, eskimo pie, whatever we chose. Mama and her friend would get Heath ice cream bars and practically swoon while savoring them.

And isn't that part of what Christmas Baking is about? Recreating joyous memories while making new ones for the children?


Saltine Cracker Toffee Bark
35 saltine crackers (about 2 sleeves)
1 cup (2 sticks) butter
1 cup brown sugar
1/2 tsp. vanilla
8 oz. (about 1 1/3 cups) semi-sweet chocolate chips

Preheat oven to 400 degrees.

Line a 15x10x1-inch rimmed baking sheet with aluminum foil. Spray with cooking spray.

Place crackers, salty side up, in prepared pan. In a saucepan, boil butter and sugar for 2 - 3 minutes, stirring constantly. Remove from heat and stir in vanilla. Pour mixture over crackers and bake for 4 - 6 minutes.

Remove from oven, and sprinkle chocolate chips all over the top. Spread evenly as chocolate begins to melt. Cool slightly and transfer to wax paper. Allow to cool completely before cutting or breaking into smaller pieces.


Tuesday, December 9, 2014

Cinnamon Roll Pretzels


CHRISTMAS BAKING IS IN FULL SWING. Today, I give you a quick and easy snack to placate cookie monsters around the house while you get some more serious cookie baking done.

These Cinnamon Roll Pretzels have that sweet and salty taste we love. Although I am not ordinarily a fan of white chocolate, I do use it for these treats. I think it gives a more "cinnamon roll" look. Vanilla candy melt will also work if you prefer.


Cinnamon Roll Pretzels
4 heaping cups pretzels
1/4 cup melted butter
1/2 cup sugar
1 tsp. cinnamon
1/2 cup melted white chocolate or vanilla candy melt

Preheat oven to 350 degrees.

In a large bowl, toss the pretzels with melted butter. In a small bowl stir together the sugar and cinnamon until well blended. Sprinkle over the buttered pretzels and mix until evenly coated.

Spread the pretzels into an even layer on parchment lined baking sheet. Bake 12 minutes. Remove from oven and cool for 10 minutes.

Drizzle with melted white chocolate or vanilla candy melt.

Allow the pretzels to cool and the candy to harden before serving.


Friday, November 21, 2014

Old Fashioned Southern Sweet Potato Pie


There has been much activity lately around this, my beloved Aunt Ruby's sweet potato pie, which I posted 3 years ago.

Can you believe, right here is the midst of pumpkin spice season, this pie uses none? I do love those spices--cinnamon, cloves, ginger, nutmeg, but I don't want everything in this season to taste and smell that way. You know what I mean--pumpkin spice latte, pumpkin spice room spray, pumpkin spice dog biscuits, pumpkin spice scones, pumpkin spice beer, and so much more. . .

You are just a click away from our family Sweet Potato Pie.

Enjoy!


Tuesday, October 7, 2014

White Cheddar Cheese Bread


I USED TO BAKE HOMEMADE BREAD ROUTINELY. For one thing, I love delicious bread. For another, good bread used to be almost impossible to find commercially and I have never lived in Paris.

However, over the past few years, good artisanal quality loaves have become easy to find in almost every grocery store.  I look at them and admire them and want to eat them. So many delicious flavors and combinations, olive oil and rosemary, roasted garlic and kalamata olive, multi-grain, sesame tahini, tomato basil, sour dough, cinnamon raisin. . .

Now I only bake bread for special occasions--because homemade is still the best.


I do still enjoy baking quick breads--biscuits, cornbread, banana bread, and this easy and delicious cheddar cheese loaf. This recipe welcomes many add-ins, diced apple, olives, spices and herbs, black pepper is good as is rosemary. Mustard powder works well and cayenne give a nice punch. Garlic is always good. I have made it with different cheeses, but cheddar is my favorite (and good with apples).

Here, I have used an extra sharp Vermont white cheddar and refrained from any additional ingredients. It depends really, on what you will use the bread for. The day I baked it, I was making omelets for supper. The next morning, I made toast and spread it with apricot jam. Then I used it as a base for Kentucky Hot Brown Sandwiches. And the next morning, because I had secreted away a thick slice of bacon, I had a bacon sandwich. Mmmm.


White Cheddar Cheese Bread
2 cups flour
1 Tbsp. baking powder
1 tsp. salt
3/4 cup milk
1/2 cup butter, melted
2 eggs
1 1/2 cups shredded sharp white cheddar cheese

Preheat oven to 350 degrees. Grease bottom only of a standard loaf pan with shortening or cooking spray.

In a mixing bowl, whisk together the flour, baking powder, and salt.

In another bowl whisk together milk, melted butter, and eggs.

Add the wet ingredients into the flour mixture, and stir until combined. Stir in cheese. Pour batter into prepared pan and bake for 50 - 55 minutes until a toothpick comes out clean.

Cool in pan for 10 minutes. Remove bread from pan to cooling rack. Cool completely about 1 hour.


Monday, August 25, 2014

Barbie Birthday Cake


OUR GIRL TURNED FIVE! Four years ago, I made  a very simple Chocolate Layer Cake for her first birthday, which you can see at the link. This year's cake was much more elaborate.

For months, she has asked me to make her a Barbie cake for her birthday. And because I had taken a cake decorating course last fall, I agreed and looked forward to the challenge.

There are a number of ways this project could be approached. Specialty pans are available. Also available are Barbie torsos on a pick that can simply be pushed into a cake. Because I try to limit my consumerism, I knew I would not buy a cake pan to use only once. Also I didn't want a Barbie bust on a stick--I wanted a whole doll that could be played with after the cake was gone.


I decided on making a chocolate sour cream pound cake using my old fashioned tube pan. Also, I used Stacie, one of Barbie's younger sisters. She is just as beautiful as Barbie, but I didn't need to make a cake big enough to accommodate the taller doll.

I made the cake the day before I decorated it. After it was baked and cooled, I place it on a fanci-foil covered cake board, applied a thin coat of frosting, which seals in the freshness of the cake and prevents crumbs in the decorations. It was refrigerated overnight.

I made 2 batches of butter cream frosting. One batch, I left white for the crumb coat, crinoline, and bodice. The other, I tinted pink.

I styled the doll's hair into a ballerina bun for both elegance and for saving from the frosting.

I began by marking, with a toothpick, the lines for the over skirt. Then I began piping the crinoline ruffles, using star tip #21, from the bottom up.

Wrap the bottom of doll with plastic wrap and insert her into the hole. Use extra balls of wrap to steady her and also to fill the hole. Don't worry about plastic wrap showing because you will pipe frosting right over it.

Because I wanted the skirt to look like fluffy and shaggy pink peonies, I used a 1M tip and made rosettes both clockwise and counter-clockwise, beginning at the bottom. Then I filled in any gaps by pressing a blossom, again using the 1M tip, into the space.

Then I applied blossoms onto the bodice, using a small #16 star tip, creating a modest halter top.


I know doll hair is highly flammable, so didn't want to put candles directly on the cake. Instead, I used the birthday cake candelabra (by Fred) I bought several months ago. To give it an anchor, I used a candied apple.

Looking back at the pictures, I thought it looked a little goth or malevolent but it didn't seem that way at the time. It looked really cool when lighted up while we were singing, "Happy Birthday". And our girl loved it.


Chocolate Sour Cream Pound Cake
(A Paula Deen Recipe)
8 ounces (2 sticks) butter, softened
8 ounces sour cream
3 cups sugar
6 eggs
1 teaspoon pure vanilla extract
2 1/4 cups cake flour
1 teaspoon baking powder
3/4 cup cocoa

Preheat the oven to 325 degrees F. Grease and flour a 10-inch tube pan.

Using an electric mixer, cream together the butter, sour cream, and sugar. Add the eggs, 2 at a time, beating well after each addition. Add the vanilla.

In another bowl, stir together the flour, baking powder, and cocoa. Add 1/2 the flour mixture to the creamed mixture, beat well, add the remaining 1/2 flour mixture, and continue to beat at medium speed for 2 minutes. Pour the batter into the prepared pan and bake for 1 hour 15 minutes. Continue to bake for an additional 15 minutes if necessary, but do not open the oven to check the cake for at least 1 hour.

Butter Cream Frosting
1/2 cup butter
1/2 cup vegetable shortening
1 tsp. vanilla
4 cups (approx.) powdered sugar
2 Tbsp. milk

Cream butter and shortening with electric mixer. Add vanilla. Gradually add sugar, one cup at a time, beating well on medium speed. Add milk and beat on medium speed until light and fluffy.


Monday, June 2, 2014

Dilly Casserole Bread


 WHEN NADINE SHARED THIS RECIPE, she told a story.

She had clipped the recipe from her hometown newspaper--The Opelika Daily News, on Wednesday, August 22, 1973. At the time, she was 8 months pregnant, expecting her third child. She was already Mother to a 3-year-old little boy and a 1-year-old baby girl. She was living in a small un-air-conditioned home, in Alabama, in the August heat, and there she was baking bread. I love her for that.


I have baked this bread several times and each time I wonder why I don't make it more often. It is easy and extremely flavorful. The additions of cottage cheese, finely minced fresh onion, and dill seed--not dill weed--provide a subtle savory flavor no one could guess.


It is a very old fashioned recipe. Not like the dense, chewy breads with a crispy crust so popular today.

I like baking it in a well buttered, smaller, 1 1/2 quart casserole. It rises and puffs up tall, looking like a giant cupcake. Indeed, the texture of the bread is very cake-like with a soft and delicate crumb and tender crust.

And the next day, toasted? Exceptional.


Dilly Casserole Bread
1 pkg. yeast
1/4 cup warm water
1 cup cottage cheese, room temperature
1 Tbsp. butter, softened
2 Tbsp. sugar
1 tsp. salt
1/4 tsp. baking soda
1 Tbsp. fresh minced onion
2 tsp. dill seed
1 egg
2 1/4 - 2 1/2 cups flour

Soften yeast in warm water and let stand 10 minutes. Combine in large bowl, the cottage cheese, butter, sugar, salt, baking soda, onion, dill seed, and the softened yeast. Beat well to blend. Add flour and beat well.

Cover and let rise in a warm place until doubled, about 1 hour.

Stir down dough. Turn into a well greased 1 1/2 to 2 quart casserole. Let rise until light, 35 to 45 minutes.

Bake at 350 degrees for 35 - 45 minutes until the crust is golden brown. Brush with soft butter and sprinkle with salt.  Cool 10 minutes, then remove bread to cooling rack.


Wednesday, May 28, 2014

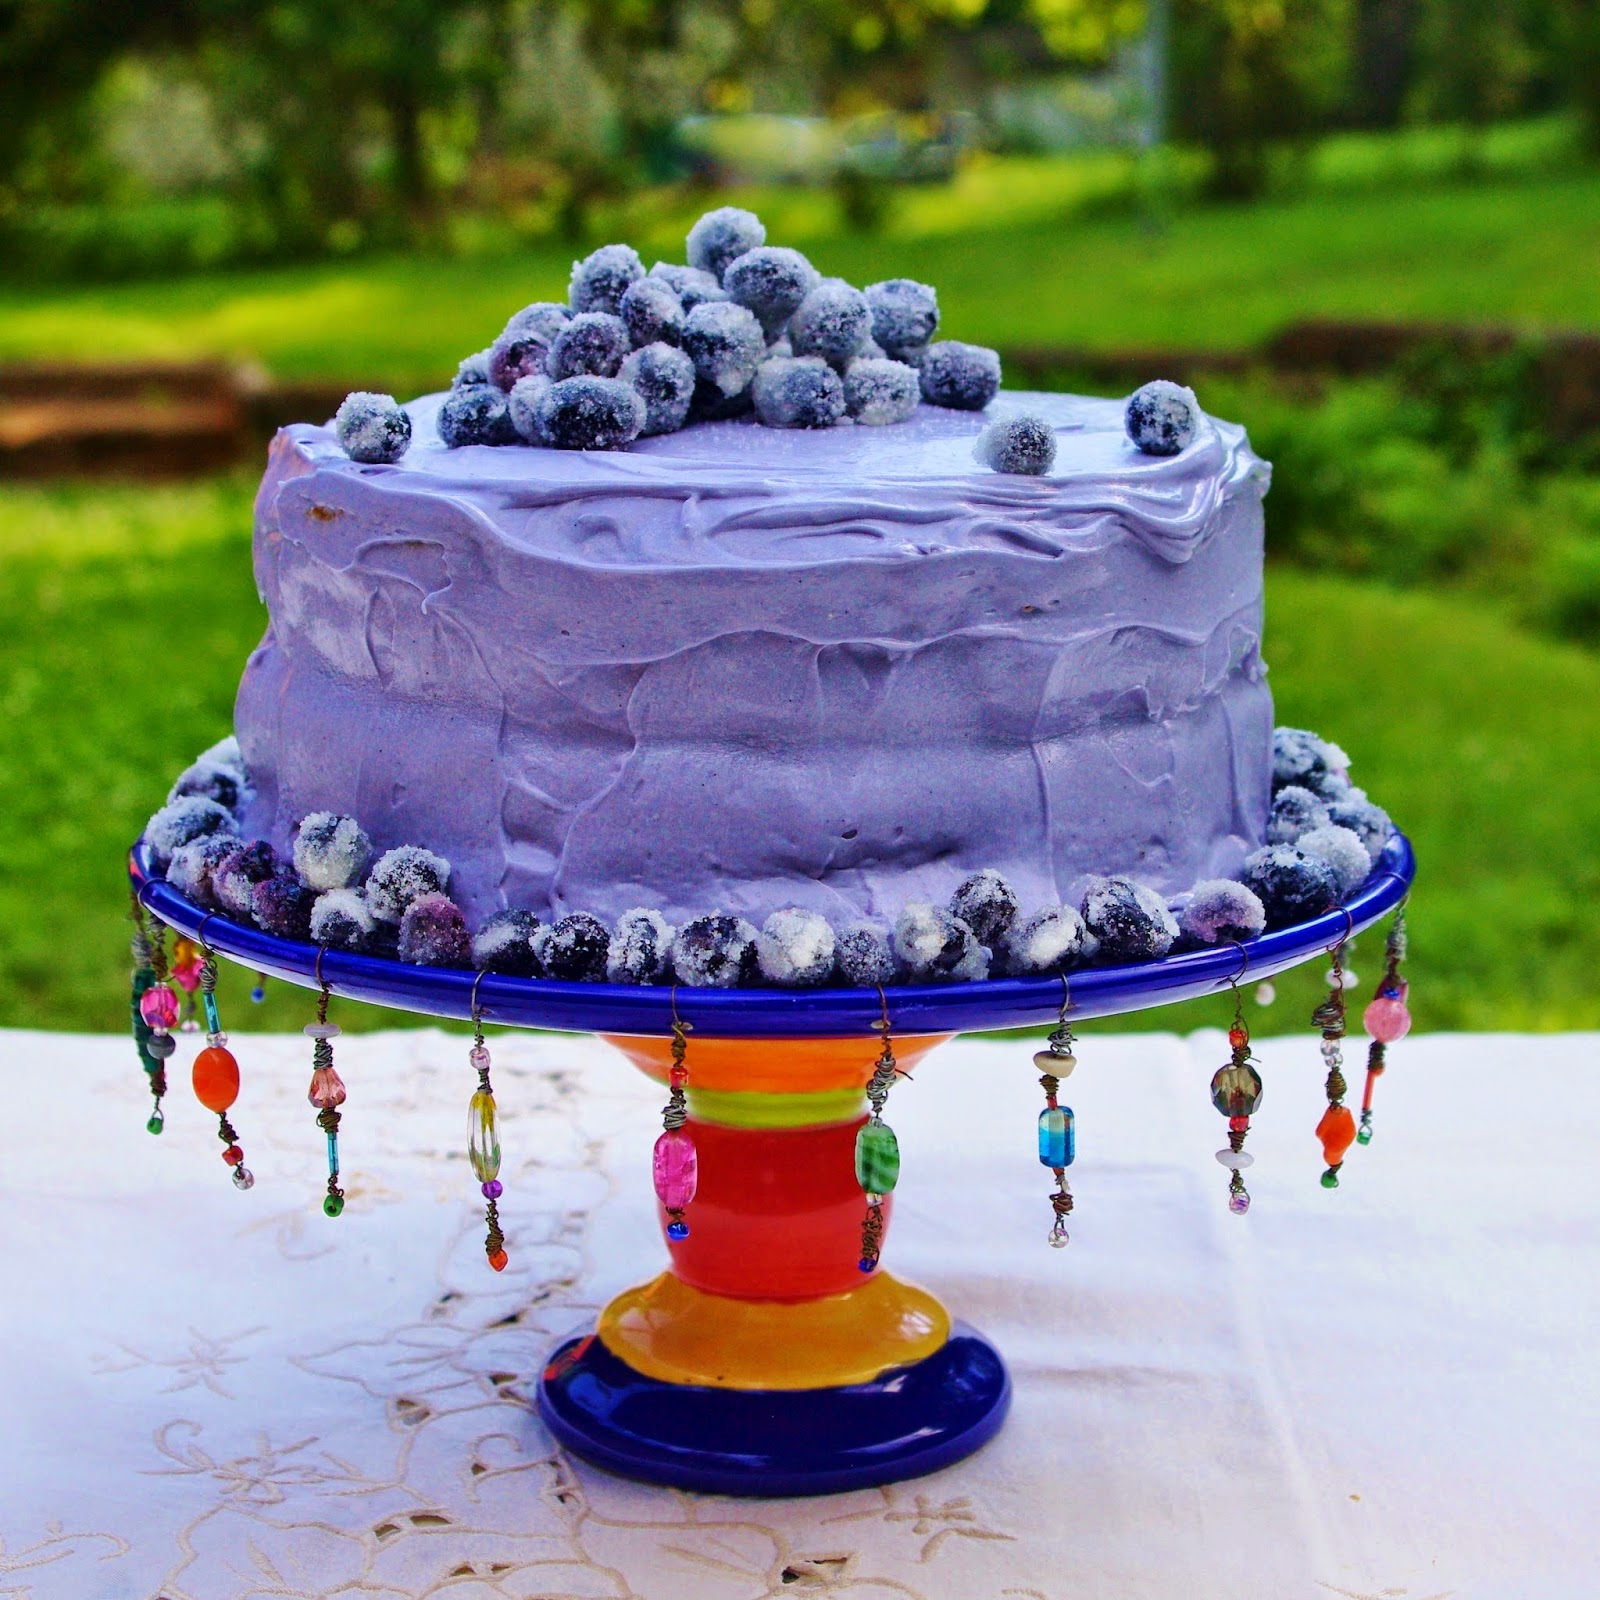
Lemon Pound Cake with Blueberry Cream Cheese Frosting Decorated with Sugared Blueberries


 IN HONOR OF THE RETREAT I ATTENDED last week (Camp Bluebird), to celebrate summer, my favorite season, and to debut the kooky and festive cake stand that followed me home from an estate sale,  I present you with Lemon Pound Cake with Blueberry Cream Cheese Frosting decorated with sugared blueberries.


Several steps were involved in making this cake, including zesting and juicing fresh lemons, preparing a lemon syrup, pureeing and straining fresh blueberries, and making  sugared blueberries so they can be set aside to dry. Those are details I like to go ahead and put behind me before even beginning the cake baking process.

The butter, eggs, buttermilk, and cream cheese all need time to come to room temperature so plan accordingly. The cake layers need time to cool completely before frosting.


To make sugared blueberries, rinse and dry fresh, plump blueberries. Beat one egg white along with a teaspoon of cold water until very frothy, but not stiff. Pour as many blueberries as you want for decorations into the egg white mixture. Roll each blueberry, individually,  in sugar and set onto a board to dry for at least 2 hours.

For blueberry puree, blend about 8 ounces of fresh blueberries in a blender. Strain out the solids in order to make a completely smooth frosting. Use leftover blueberry puree for making smoothies.


Lemon Pound Cake
1/2 pound (2 sticks) butter, room temperature
2 cups sugar
4 eggs, room temperature
1/3 cup grated lemon zest
3 cups flour
1/2 tsp. baking powder
1/2 tsp. baking soda
1 tsp. salt
3/4 cup buttermilk
1 tsp. vanilla

Preheat oven to 350 degrees. Grease and flour 2 (8-inch) cake pans.

Cream butter and sugar, with electric mixer, until light and fluffy, about 5 minutes. Add eggs, one at a time, mixing well after each addition. Stir in the lemon zest.

Sift together the flour, baking powder, baking soda, and salt in a bowl. Add the flour and buttermilk alternately to the batter, beginning and ending with the flour. Blend in vanilla.

Divide the batter evenly between the prepared pans and smooth top. Bake for 35 to 45 minutes or until a toothpick inserted in the center comes out clean. Let cool in pans for 10 minutes. Turn out onto cooling racks set over wax paper.

While cakes are baking, make a lemon syrup by combining 1/2 cup sugar with 1/2 cup lemon juice in a small saucepan. Cook over low heat until the sugar dissolves. Spoon over the cakes on the cooling racks, then let the cakes cool completely before frosting.

Blueberry Cream Cheese Frosting
8 oz. (1 stick) butter, softened
8 oz. cream cheese, softened
3 Tbsp. blueberry puree
1 tsp. vanilla
pinch of salt
4 cups powdered sugar, as needed

Whip butter and cream cheese with an electric mixer until very pale and creamy, about 8 minutes. Mix in blueberry puree and vanilla. Add powdered sugar, 1 cup at a time, and beat well until fluffy. If the frosting is too stiff add a little blueberry puree; if too thin, add more powdered sugar. Use about a cup of frosting between the cake layers and the remaining for the top and sides of the cake.

My frosting was a little more oozy than I usually like it because I was trying to achieve a vibrant blueberry color. I used more puree and less sugar than I would have used if I'd wanted to pipe frosting onto the cake.

Decorate with sugared blueberries.


Tuesday, April 22, 2014

A Very Old-Fashioned Southern Coconut Icing


AT 85-YEARS-OLD, my Mother still loves to entertain.  She had an Easter brunch for 16 people and when she half-heartedly invited me, she didn't think I would really make the trip. After thinking for a while, and talking to my husband about it, I decided, sure why not?

With only three days notice, I made an 800 mile round trip which included driving twice through the sprawling hellscape of Atlanta. Everyone in the Southeast knows about "driving through Atlanta". The people who live in Atlanta know about "driving through Atlanta".


When I got to Mama's, she asked me to make the cake. In an old box of recipes, she had found her own Mother's tattered, yellowed, hand-written recipe for coconut cake.  That makes this recipe at least a hundred years old.

The actual cake was a basic pound cake. It is topped with a unique, cooked icing. A sturdy cake is needed to stand up to this icing (not frosting) which is substantial and glaze-like. Poke some holes in the cake before spooning on the hot icing and also let it run down the sides. Don't let the cake's homely appearance dissuade you; this is a scrumptious cake, which tastes even better the second day.


Mama is not only a fabulous cook, she grows her own flowers for decorations and sets a beautiful table. The menu included baked ham, scrambled eggs, baked cheese grits, fruit salad, roasted asparagus with olive oil and lemon, and fluffy homemade rolls.

It was a wonderful party!


Old-Fashioned Southern Coconut Icing
1 1/2 cups milk
3 cups sugar
1/2 cup (4 oz.) butter
2 cups fresh (or frozen and thawed) grated coconut

In a heavy 3 quart saucepan, bring the ingredients to a boil over medium heat. Cook and stir until thickened, about 15 - 20 minutes. Stir in coconut and continue cooking until thick, about another 10 minutes.

Place one cake layer on a serving plate. Prick it several times with a toothpick then spoon over about one third of the hot icing. Top with the other cake layer, prick a few holes, and evenly pour over the remaining icing letting it drip down the sides of the cake.