Saturday, December 31, 2011

Black-Eyed Peas for the New Year

Baby Eating Black-Eyed Peas 


 I would not consider starting a new year without eating some black-eyed peas for luck and so far, I have been a very lucky person.  


In the South, we also eat greens; in my family, we traditionally eat collards. The greens are for wealth and I feel extremely rich.


By luck and wealth, I don't mean I have won any lotteries or live in a mansion. Far from it. 


We live in a very modest home, which is warm and cozy. It is filled with books, laughter, harmony, family and friendship, doggie love, delicious and healthful food, peace, and gratitude. I feel perfectly content and extremely grateful.


Here are a few black-eyed pea recipes for consideration. Myself, I am taking a different direction this year. I'm going to make Curried Black-Eyed Peas (Lobia Tariwaala) and Saag Paneer---black-eyed peas and greens from another culture. I will be posting these recipes next weekend for my ongoing Curry-Palooza project.  


Crock Pot Black-Eyed Pea Soup


Hoppin' John

Texas Caviar

 HAPPY NEW YEAR!!

Friday, December 23, 2011

Ginger Oatmeal Lace Cookies


These Oatmeal Lace Cookies are very delicate, tender, and crisp. The batter is a cinch to make on the stove top rather than the mixer, and they keep well for several days in an airtight container.  The crystallized ginger gives an unexpected, pleasant bite. 

If you love oatmeal cookies and are a fan of ginger, this is a cookie for you!

Ginger Oatmeal Lace Cookies
(adapted from Martha Stewart)
1 1/2 cups (3 sticks) unsalted butter
3 cups uncooked old-fashioned rolled oats
1 1/2 Tbsp. all-purpose flour
1 tsp. salt
1 3/4 cup sugar
2 tsp. vanilla
2 eggs, lightly beaten
2 Tbsp. finely minced crystallized ginger

Preheat oven to 325 degrees. Line baking sheets with parchment paper.

In a large saucepan over low heat, melt the butter. Let cool a bit and add oats, flour, salt, sugar, and vanilla. Stir well to combine, then add the eggs. Mix thoroughly and stir in the minced ginger.

Drop 1 Tbsp. of batter at a time on the parchment, leaving at least 3 inches between cookies. Flatten batter into a circle with the back of a spoon.  Bake for 13 to 15 minutes, rotating pans half way through baking, until just golden brown. Cool on pans for about 5 minutes. Carefully remove cookies from pan with a thin spatula and let cool completely on wire racks. 


Sunday, December 4, 2011

Old Fashioned Southern Sweet Potato Pie


Almost every recipe I see for Sweet Potato Pie calls for the addition of cinnamon, cloves, ginger, nutmeg--the pumpkin pie spices. As a girl growing up in Alabama, I don't remember my Grandmother's and my Aunties' Sweet Potato Pies tasting like my Mother's pumpkin pie (and she makes the best).

Aunt Ruby made the best Sweet Potato Pie. She also made the best ice tea, which she made with loose tea then strained into a pitcher. Hers was the perfectly sweetened tea, not too sweet, just right. And she served it over crushed ice.

I remember her sweet potato pie simply tasting like sweet, buttery, vanilla scented sweet potatoes. Delicious!

Her recipe calls for the addition of light Karo syrup. Karo syrup is an old-fashioned corn syrup, used to soften texture, add volume, prevent crystalization of sugar, and enhance flavor. It is not to be confused with the high fructose corn syrup of today, though still widely available in grocery stores.


Aunt Ruby's Sweet Potato Pie
1/2 cup butter
1/2 cup light brown sugar
1/4 cup light Karo syrup
2 eggs, beaten
1 can evaporated milk
3 cups cooked, mashed sweet potatoes
2 tsp. vanilla
1/4 tsp. salt
1 unbaked 9-inch pie crust
Nutmeg (optional)

Preheat oven to 375 degrees. Cream butter, brown sugar and syrup together. Add eggs and stir. Add sweet potatoes and mix well. Stir in the milk, vanilla and salt, making sure all ingredients are thoroughly mixed. Pour into the pie shell and bake 40 minutes, or until a knife inserted in the center comes out clean. Dust top with freshly grated nutmeg if desired.

Friday, December 2, 2011

Cornbread Dressing with Fresh and Dried Fruit


I had to report for Jury Duty this morning but was dismissed early. I could have gone into work, but decided to blow it off. (Shh! Don't tell the boss!)  I had already prepared, workwise, to have the day off. I made sure my office was in order and that I was prepared for Monday. And besides,  I don't like to walk into an office that is already humming. I like being the first one in. 

Each morning, I arrive early, open the gate, unlock the doors, turn off the alarm, turn on the lights, adjust the thermostat, make the coffee.  I put my lunch in the fridge, turn on my computer, check my email, and prepare for my work day. All while it is still and quiet. By the time my co-workers begin to arrive, I am well into the day.

Today, I decided to come home and give my blog some love! I miss my blog and my blog friends. I never dreamed my job would take so much of my energy.  Three evenings, after work, I go to the gym. Every night I cook dinner so we can enjoy delicious and healthful meals each day. I take my lunch to work every day. All these things are very important to me.

After dinner, and after the kitchen is packed away for the night, I sit down in front of my computer, in my very comfortable office chair, with the intention of blogging . . . and promptly fall asleep. 

~ * ~ * ~ * ~

We had, for varying reasons, a very quiet Thanksgiving. I did not bake a turkey, but rather a ham. And I fashioned my menu much like a brunch. Among other things, I made a Cheese Grits Souffle, Angel Biscuits,
Tomato Gravy, and an old fashion Sweet Potato Pie. 

I did not make my usual Southern family favorite dressing. Instead I made this recipe from the November, 2006 edition of Bon Appetit. I have made this recipe a few times before, usually for New Year's.  It is very moist and flavorful and I think it goes especially well with ham.

Cornbread Dressing with Fresh and Dried Fruit
Buttery cornbread (recipe below)
1/2 cup butter
4 cups chopped onions
4 cups chopped, unpeeled apples
2 cups chopped celery with leaves
24 pitted prunes, diced
12 dried apricot halves, diced
1 Tbsp. sage
1 tsp. salt
1 tsp. freshly ground black pepper
1/2 tsp. thyme
1 cup chicken broth

Cut the cornbread into 1-inch cubes. Spread onto a sheet pan and bake in a 250 degree oven, to dry out some, while you prepare the rest of the ingredients.

Melt butter, in a large skillet over medium heat. Add onions, celery, and onions and saute about 10 minutes, until beginning to soften. Scrape the vegetables into a large bowl. Add prunes, apricots, sage, salt, pepper, and thyme. Add the cornbread cubes and toss until evenly combined.

Pour mixture into a well buttered 13x9 inch baking dish; pour broth evenly over. Place into a preheated 375 degree oven. Bake until heated through and the top begins to form a crust, about 40 minutes.

Buttery Cornbread
1 1/3 cups coarse-ground yellow cornmeal
1 cup flour
1/4 cup sugar
2 tsp. baking powder
1/4 tsp. salt
1 1/4 cup buttermilk
9 Tbsp. melted butter
2 eggs, beaten

Place all ingredients into a large mixing bowl and blend together thoroughly, but don't over mix. Pour into a well buttered 9x5x3-inch loaf pan and bake at 375 degrees for 40 minutes, until a tester inserted in center comes out clean. Cool in pan for 5 minutes then turn bread out onto a rack until completely cooled. 


Delicious the next day topped with an egg.

Sunday, November 13, 2011

Crock Pot Black Beans--Cuban Style


Friday, after a particularly difficult and tedious week at work, I practically had to crawl to my car for the 30-40 minute drive home.  I wasn't very far into my commute when I realized I had no energy, whatsoever, to prepare supper--not even an omelet. I stopped by a take-out BBQ joint and ordered smoked pulled pork with a couple of sides.

Once home, I quickly kicked off my shoes, snatched off my bra, donned my pajamas, and I was ready to relax and recuperate from the week.  We sat on the sofa to eat our meal while watching mindless and stupid TV. 

Later, I decided to use the remainder of the smoked meat to flavor a pot of beans. And I chose Cuban Black Beans.

Dried beans, which are such an affordable and health giving food, are a cinch to make in the crock pot-- no soaking required.  But you do need to allow plenty of time for them to cook.  I put these beans on before I went to bed and there they cooked, on low, all the next day.


Crock Pot Cuban Black Beans
1 lb. dried black beans
Pork, ham, bacon, etc, (optional)
1 large onion, diced
1 bell pepper, chopped
3-4 (or more) cloves garlic, minced
Salt and freshly ground black pepper to taste
1/2 tsp. dried oregano
1 bay leaf

Pick over and inspect dried beans for any stones or other foreign debris. Rinse thoroughly.  Place the beans in the crock pot along with the remaining ingredients. Stir together and barely cover with water. Place the lid on the pot, turn to low heat, and cook for 10 to 12 hours until the beans are tender.

Before serving, stir in 1 Tbsp. vinegar, 2 tsp. sugar, then drizzle with olive oil.


Delicious with yellow rice and fried plantains.


Saturday, November 5, 2011

Curry-Palooza #8: Masaledar Chholay (Chickpeas in Spicy Tomato Gravy)


Camille chose the recipe for this month's Curry-Palooza. I was very happy when she picked this healthy make-ahead vegetarian dish which was featured in the March, 2011 issue of Food and Wine Magazine.  I already had the magazine page flagged and was so inspired by the article, that I immediately ordered Chef Sanjeev Kapoor's newest cookbook.  The recipe I chose for last month's Curry Palooza is from that very book. 

This recipe is easy to make and it is SPICY!!  I cooked it a day before we ate it and that turned out to be a good idea.  The spiciness had mellowed and mingled and the taste was richer the following evening.

Chef Kapoor meant it when he said:

"Indian Food is not subtle. Indian food is in your face."

Chick Peas in Spicy Tomato Gravy

8 garlic cloves, chopped
2 jalapeƱos, chopped
One 2-inch piece of fresh ginger, peeled and chopped
1/4 cup vegetable oil
3 onions, cut into 1/4-inch dice
 2 tablespoons ground cumin
 1 tablespoon ground coriander
 3/4 teaspoon cayenne pepper
 1 1/2 cups canned diced tomatoes
 Two 15-ounce cans chickpeas, drained and rinsed
 2 cups water
 Salt
 2 tablespoons cilantro leaves

 In a mini food processor, combine the garlic, jalapeƱos and ginger and process to a paste. In a large nonstick skillet, heat the oil. Add the onions and cook over moderately high heat until sizzling, about 3 minutes. Reduce the heat to moderate and cook, stirring occasionally, until the onions are browned, about 7 minutes. Add the garlic paste and cook, stirring, until fragrant, about 2 minutes. Add the cumin, coriander and cayenne and cook, stirring, for 1 minute. Add the tomatoes and simmer over moderate heat until thickened, about 6 minutes. Add the chickpeas and water and simmer until the chickpeas are flavored with the gravy, about 8 minutes. Season the chickpeas with salt, garnish with the cilantro and serve.


Serve With Yogurt and naan.


Sunday, October 30, 2011

Applesauce Muffins - 2 Ways


After my boss received a gift of fresh, locally grown apples, he took them to the break room to share with the staff. I brought home several of these apples with the intention of making muffins to share at work. And of course I had to make enough muffins to include Pritchard Parker.

The first batch I made had golden raisins and pecans, with a drizzle of confectioner's sugar glaze. I thought they were very pretty, but when Pritchard Parker tasted one he said, "That's different".  Now I have to say that Pritchard Parker had gotten home from work very late and was quite tired when he said that. He was not really in a place to offer a fair critique and I didn't pursue it.

Different? Just to be safe, I decided to go with another recipe for the next batch. This time I skipped the raisins and used brown sugar and toasted walnuts with  a sugary crunch for topping.

Both recipes begin by making applesauce.


Applesauce Raisin Muffins
1 3/4 cups flour
1/4 cup sugar
2 tsp. baking powder
1 tsp. cinnamon
1/4 tsp. freshly grated nutmeg
1 egg
1/2 cup milk
1/4 cup vegetable oil
3/4 cup unsweetened applesauce
1/4 cup golden raisins
1/4 cup chopped pecans

Stir together the flour, sugar, baking powder, and spices. In another bowl, stir together the egg, milk, vegetable oil, and the applesauce and mix well. Stir the dry mixture into the wet until just combined. Stir in the raisins and nuts.

Spoon into greased muffin cups and bake at 400 degrees for 12 to 15 minutes. Let them cool slightly then remove to a wire rack to cool completely. If desired, top with a glaze made of 1/2 cup confectioner's sugar, 1/2 tsp. vanilla, and 1-2 Tbsp. milk or cream.  Add an additional sprinkling of freshly grated nutmeg.


Applesauce Spice Muffins
(Gourmet Magazine, November 2003)
1 1/2 cups flour
1 1/2 tsp. baking powder
1/2 tsp. baking soda
1/2 tsp. cinnamon
1/2 tsp. ground allspice
1/4 tsp. freshly grated nutmeg
1/4 tsp. salt
2 large eggs
1 cup light brown sugar
1 stick (1/2 cup) plus 3 Tbsp. unsalted butter, melted
1 cup unsweetened applesauce
1 cup toasted walnuts, coarsely chopped

Topping:
2 Tbsp. Turbinado (or regular granulated) sugar
1/4 tsp. cinnamon
1/4 tsp. ground allspice
1/4 tsp. freshly grated nutmeg

Stir together flour, baking powder, baking soda, spices, and salt in a bowl. Whisk together eggs and brown sugar in a large bowl until combined well, then add butter, a little at a time, whisking until mixture is creamy. Stir in applesauce, then fold in flour mixture until flour is just moistened. Stir in nuts and divide batter among greased muffin cups.

Stir together the topping ingredients and sprinkle on top of the muffins. Bake at 400 degrees until muffins are puffed and golden, about 20 minutes. Cool in pan on a rack 5 minutes, then remove muffins from pan and cool completely.


These are the muffins I took to work.


Tuesday, October 18, 2011

Beets in Citrus Sauce


We love vegetables and beets are no exception. I think some people are put off by their gaudy magenta hue, but even as a kid, I loved that color and felt very attracted to beets. Also, it is hard to imagine by looking at the hard, crunchy, gnarly, and often hairy exterior of a beet that it could ever cook into a vegetable so sweet and buttery textured.   

Beets are a nutritional power-house; another reason to love them.  They can be juiced, grated raw as a topping for salads, oven roasted, grilled, or steamed, all with delicious results.

I have made Beets in Citrus Sauce many times over the years. The addition of the lemon and orange really brighten the flavor, the small amount of sugar takes away the earthy flavor some people find objectionable. And the cloves add a distinctly fall flavor.

Beets in Citrus Sauce
(adapted from The Vegetarian Epicure by Anna Thomas)
1 1/2 to 2 lb. young beets
1 1/4 cups liquid from beets
1 lemon
1 Tbsp. orange peel, freshly grated
2 Tbsp. sugar
1/2 tsp. ground cloves
2 Tbsp. frozen orange juice concentrate
1 1/2 Tbsp cornstarch
1 Tbsp. butter

Cook the beets whole, in simmering water, until just tender. Drain, reserving liquid, peel and slice thin. Pour liquid from the beets into a pot, add the grated peel and the juice of 1 lemon, the grated orange peel, sugar, salt, cloves, and the frozen orange juice concentrate. Dissolve the cornstarch in just enough water to make a smooth paste and add that also.  Beat the mixture lightly with a whisk and cook until it becomes clear.

Add the sliced beets and the butter, heat it through, correct the seasoning, and serve very hot.


Friday, October 7, 2011

Gulab Jamun

Curry-Palooza #7


It was my turn again, to choose the recipe for Curry-Palooza.  All along I had been thinking I would choose a shrimp recipe next. But since we just had seafood for our last event, I wanted to go with something else. I thought about some of my favorites when ordering in Indian Restaurants, but we had already done some of them, or something very similar. I finally decided on a dessert.

When dining out, I always choose Kheer, a delicious rice pudding. But I have always been curious about Gulab Jamun, and decided on that.  The recipe I chose is from the book, How to Cook Indian by Sanjeev Kapoor, a new book with over 500 recipes. I had been hearing about the book, so finally ordered. It is a very thick book, and disappointingly, it does not have a single picture.

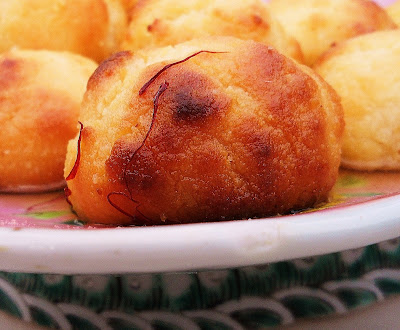
I don't know what I was expecting Gulab Jamun to be, but it is not this. Mine tasted like little Southern-style biscuit balls with syrup. They would probably be a hit at a brunch table, along with the scrambled eggs, bacon, fresh fruit, and hot coffee.  In fact, I may do exactly that, the next time I host a brunch. 


Gulab Jamun
How to Cook Indian by Sanjeev Kapoor
1 cup dry milk powder
2 Tbsp. pastry flour
1/4 tsp. baking soda
1/4 cup plain yogurt, whisked
1 1/4 cups sugar
1 tsp. milk
1/4 tsp. ground green cardamom
Pinch of saffron threads
2 1/4 cups ghee

Put the milk powder in a bowl. Add the flour and baking soda, and stir well.  Add the yogurt and stir to make a soft dough.  Divide into 16 equal portions and shape them into round, smooth balls.  Set aside.

To make the sugar syrup, place a saucepan over high heat and add 1 cup water. Add the sugar and cook, stirring continuously, until the sugar is dissolved.  Add the milk and stir.  The scum containing the impurities in the sugar will rise to the top.  Gently gather it with a spoon and discard.  You will get a clear syrup.  Add the cardamom and saffron, and stir.  Cook until the syrup reaches 130 degrees.  Remove from the heat and cover to keep warm.

Place a wok over medium heat and add the ghee.  Heat until the ghee reaches a temperature of 160 degrees, or until fragrant.

Gently slide in four dough balls at a time and cook, gently spooning hot ghee over the balls with a slotted spoon, until the balls are deep golden, about 2 minutes, about 2 minutes.

Drain the balls in the slotted spoon and transfer them to the sugar syrup.  Repeat with the remaining balls.  Soak in the syrup for at least 15 minutes before serving warm or at room temperature.


Curry-Palooza is a monthly blogging event with the goal of exploring Indian cuisine. We would love for you to cook along with us.


Saturday, October 1, 2011

Grilled Ratatouille


Three weeks ago, a tractor-trailer truck with a load of locally grown tomatoes, over-turned on one of our narrow, steep and winding rural roads.  Tomatoes were all over the place! Many, many boxes of the tomatoes were rescued but were deemed (by whatever authority) unsaleable, due to the accident. Many were donated to local food banks and soup kitchens. Lucky for me, I happened to be in the right place at the right time, and found myself the happy recipient of two 25 pound boxes of beautiful, large and plump Roma tomatoes.  No one wanted to see these tomatoes wasted.  (And no one was injured in the accident).

I canned one box of them for the winter. With the other, I have made all kinds of tomato-ey things--tomato sauce, tomato soup, pizza, salsa, grilled cheese with tomato sandwiches, two pans of oven dried tomatoes, and I still have a nice bowl full of them to finish off this weekend.

Another thing I made is Ratatouille, which is a delicious dish to make and eat in very late summer to early fall, when the fresh, local, tomatoes, eggplant, bell peppers, and squashes are still available. Ratatouille can be eaten cold with crackers and cheese when the weather is balmy. Or it can be treated as a hot and comforting stew for blustery autumn evenings, served with french bread and brie. 

There are many ways to make Ratatouille, and here is one.

Grilled Ratatouille
3 large onions, roughly chopped
3- 4 plump cloves garlic, chopped
2 bell peppers, any color, quartered, seeds removed
8 Japanese eggplant, split in half lengthwise
6 summer squash, split in half lengthwise
4 very large ripe tomatoes, peeled and coarsely chopped
Salt and freshly ground black pepper
1 Tbsp. fresh rosemary, finely chopped
Olive Oil

In a large soup pot, cook onions, in olive oil, over medium low heat, until tender. Meanwhile, drizzle peppers, eggplant, and squash with olive oil, and salt and pepper them. Grill until tender. Chop the grilled vegetables to desired size and add to the pot with the onions. Add the garlic. Stir together, and simmer for a few minutes. Finally add the chopped tomatoes and the fresh rosemary. Cover and simmer for about 30 minutes. Taste and adjust seasonings.

Sunday, September 18, 2011

North African Couscous Paella


My husband enjoys bringing me gifts and of course, I love that about him. These gifts could range from an article of clothing, a gadget for the kitchen, a book, an excellent bottle of olive oil he found on sale, or even a pretty rock he found while on a hike.  These gifts always let me know he was thinking of me. 

Recently, after a trip into a used bookstore, he brought me a cookbook, Moosewood Restaurant Cooks at Home.  The subtitle is "fast and easy recipes for any day".  He chose well; the book contains recipes which are simple to make and don't resort to cans, boxes, and mixes, but rather rely on fresh foods.

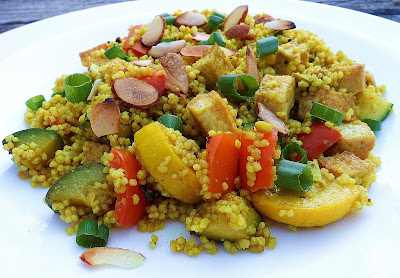
I have already made two recipes from this book and they were both delicious. This is one of them. The only difference between my version and the original is the fact that the recipe called for frozen peas and I used one zucchini and one yellow squash instead because I had them on hand. 

I used tofu in the dish, but you could also use shrimp or chicken. The beautiful golden color of the couscous comes from the addition of turmeric. This is a meal in a pot.

North African Couscous Paella
(adapted from Moosewood Restaurant Cooks at Home)
2 Tbsp. vegetable oil
1 lb. firm tofu, cubed
2 Tbsp. teriyaki sauce
1 red bell pepper, chopped
4 scallions, sliced
1 medium zucchini, chopped
1 yellow squash, chopped
2 cloves garlic, minced
1 tsp. ground  coriander
1 cup couscous
2 cups hot water
1 Tbsp. butter
Salt and pepper to taste
Toasted, sliced almonds

In a wok, heat 1 Tbsp. vegetable oil over medium high heat. Add the tofu, stir and fry until golden. Remove from wok and sprinkle with the teriyaki sauce. Set aside and keep warm.

Add another 1 Tbsp. vegetable oil to the wok, and stir fry all the vegetables for 2-3 minutes. Add the garlic, coriander, turmeric and cayenne; stir and cook for another 30 seconds. Add hot water, couscous, and butter. Stir well, cover, and remove from heat; let stand for 5 minutes.

Uncover the pan and using a fork, stir thoroughly to fluff up the couscous and break up any lumps. Gently stir in the tofu. Season with salt and pepper to taste. Serve with toasted, sliced almonds.


Saturday, September 10, 2011

Southern Tomato-Cheese Pie


Here is an old Southern recipe that has been changed and modified by almost every cook who makes it yet remains essentially the same.  Some of the variations have to do with the crust. Some use a basic pastry crust but I use a biscuit crust because I think it holds up better to the juicy, fresh, ripe tomatoes, without becoming soggy. 

Most recipes I've seen call for 2 cups grated cheese and 1 cup mayonnaise for the topping. I can't deal with that much mayo, so I make a good, homemade pimiento cheese to use for the topping. 

A couple of days ago, I got home from work to see this sack on my porch.


When I looked inside, this is what I found.


 It looks like our next-door-neighbor harvested the remnants of her summer garden.  I made this tomato pie from those beautiful, vine-ripened tomatoes. I'm thinking about those green tomatoes and the peppers. They will be used. 

Southern Tomato-Cheese Pie
1 cup Bisquick
1/3 cup milk
1 jumbo Vildalia onion, thinly sliced
2 lb. garden fresh tomatoes, sliced
Fresh basil leaves, to taste, thinly sliced
Salt and freshly ground black pepper, to taste
One recipe homemade pimiento cheese

Preheat oven to 450 degrees. Combine the Bisquick and milk to form a soft dough. Knead the dough lightly, then press into a pie dish. Use either pie weights or another pie plate, to keep the dough from rising too much. Bake for 10 to 12 minutes. Place on a rack to cool. Lower the oven to 350 degrees. 

Make the pimiento cheese and set aside.

Slice the tomatoes and set out on paper towels to drain.  Slice the onion very thinly.  Slice the basil.

In the crust, layer the onions and tomatoes, really high, using salt, pepper, and basil on each layer of tomato.  Spread the pimiento cheese over the tomatoes and onions to form a top crust. 

Bake at 350 degrees for 45 minutes to an hour. Let cool for 10 minutes before slicing.


Monday, September 5, 2011

Banana Bread for Pritchard Parker (A re-post from March 15. 2009)


When my mother visited, she brought a loaf of banana bread. I never had any of it, and I think my husband, Pritchard Parker, ate most of it. For weeks, he would mention that banana bread, every now and then. He would say something about speaking to someone at work about that banana bread! I finally got the hint and asked Mama for the recipe. It is a recipe from the January, 2005 edition of Southern Living, called Cream Cheese Banana Nut Bread. You can find the recipe here.
 

The recipe gives four different toppings for the bread, which all sound delicious. Mama used, therefore I did, a simple confectioners sugar/half and half glaze. After all, I was trying to replicate the banana bread Pritchard Parker had fallen in love with--hers.

The recipe makes enough batter for two loaves. I made one loaf, and with the rest of the batter, I made muffins, in my hip, new, square muffin pan. Those were for Pritchard to take to work and share, IF he wanted to.

A note about bananas: I did not use overly ripe bananas for the bread. And I realized why I never liked banana bread in the first place. It always tasted like rotten bananas. The ole, "Don't throw those bananas away, you can make banana bread" routine. Yuck.

This banana bread had a good, creamy banana taste, and without a funky color. Pritchard Parker said it was every bit as good as my mother's.

That is a compliment!

I am sharing this recipe with Cookbook Sundays at Mom's Sunday Cafe


Friday, September 2, 2011

Patra-Ni-Macchi

Curry-Palooza #6


Camille of Croque-Camille chose the recipe for this month's Curry-Palooza. She picked Patra-Ni-Macha from the lovely blog, Quick Indian Cooking.

We loved this dish! However, I admit I strayed from the given recipe because it called for an entire bunch of cilantro. And I just don't enjoy that herb. I used parsley instead. And because parsley is so much more subtle in flavor, I searched out some other recipes for the same dish. As a result, I added 6 cloves of garlic rather than 3. I also added 1 tablespoon of freshly grated ginger, 1 teaspoon toasted and ground cumin, and 1 teaspoon of brown sugar to the chutney paste. 

I also saw mention of brushing ghee onto the delicate banana leaves to help keep them from splitting.  I thought  that was a good idea, because the banana leaves are very fragile.  And so I did.


Wash the fish and cut into serving sized pieces, as desired. Cut a piece of banana leaf-those things are huge--into a size that will gift wrap your piece of fish.  You don't need to secure them, just place them seam side down onto a steamer pan. 


Banana Leaf Wrapped Fish


The Color Changes After Steaming


Enjoy with rice, lemon wedges, tomato, and cucumber.

I love this monthly Curry-Palooza event. Not only am I learning more about Indian cookery, I am learning more about the varying cultures within India. Last month's dish was a Bengali dish, and this one is a signature dish of the Parsi peoples in Mumbai. I have been taking some time to learn what that means. I think it is important to understand the beliefs and customs of other cultures. Now, more than ever. Do you?

One of the co-founders of our little group, Grapefruit of Needful Things, couldn't cook along with us this month. Here are the other posts:


I see that Indian Cuisine is gaining in popularity, so I hope you will consider cooking along with us. Just let any of us know and you're in. No cliques here. And you will even get to choose a recipe! 


Wednesday, August 31, 2011

Old Fashioned Peach Pie


I love making a lattice crust for my fruit pies. I think it looks so pretty, and decidedly homemade. For the added "pie appeal", lattice is easy to make. Here are Elise's, from Simply Recipes, lovely step-by-step photographic instructions.

One thing that irks me about pie recipe instructions, is the fact that they almost always include something akin to, "if the edges of the pie start getting too dark, cover them with strips of aluminum foil. Surprise, the edges always get too dark.  And have you ever tried covering the edges of a round pie with strips of rectangular foil while the pie is steaming hot? All the while, letting the oven heat escape. 

Go ahead and loosely cover the edges of the pie with strips of foil before putting it into the oven. It is so much easier to remove them toward the end of baking time.

Many peach pie recipes call for "warm" spices, such as cinnamon. I love cinnamon, but it makes me think of fall.  I want my peach pie to taste like peaches and summer. And what a glorious peach season we have had this year.

Old Fashion Peach Pie
(My Mother's Recipe)
Your favorite recipe for a 9-inch double crust pie
1 egg, beaten
5 cups peeled and sliced peaches - about 7 to 8 peaches
2 Tbsp. lemon juice
1/4 cup flour
3/4 cup sugar
2 Tbsp. butter

Preheat the oven to 450 degrees.

Line the bottom and sides of a 9-inch pie dish with one of the pie crusts. Brush with some of the beaten egg.

Place the sliced peaches in a large bowl and stir in the fresh lemon juice. Add the sugar and flour. Mix together very well, yet gently.  Let sit for 10 to 15 minutes. 

Place peaches into the prepared crust and dot with butter. Top with lattice crust. Brush with some of the beaten egg yolk.  Bake for 10 minutes in the preheated oven, then reduce heat to 350 degrees and bake for an additional 30 to 35 minutes, until browned and the juices are bubbling through the spaces of the lattice.


Serve with vanilla ice cream.


Sunday, August 28, 2011

A Special Grilled Cheese & Tomato Sandwich


Lately, I have been blessed with so much fresh, homegrown produce. Our neighbor has gifted us with the most beautiful and delicious tomatoes I have ever seen or eaten.  One of my co-workers brings in vegetables from her garden to share. And another co-worker brings baskets of fruits and vegetables from the Farmers' Market.  (Today I will be making a peach pie from some of that gifted fruit). 

The main benefit, of course, to my working fulltime is the extra income. I can now, once again, do a little splurging at the grocery store.  My first joyful splurge was in the cheese department. I love cheese! For too long, I had been mostly limiting myself to the store brand cheeses and Parmesan in the green can. How delighted I was to purchase a wedge of Parmesano Reggiano and also the Tillamook cheddar cheese, which I used to make this sandwich. That really is a delicious cheese.

I have mentioned two things that made this sandwich special--the homegrown tomato and the Tillamook cheese. The third thing was the hearty oat bread I purchased at a local bakery. Lovely.  And lastly, the fact that I smeared the outside of the bread with Ghee (another of my splurges) before grilling.

Grilled Cheese and Tomato Sandwich
2 slices of sturdy bread
A few slices of Tillamook cheddar cheese
Slices of fresh tomato
Salt and pepper
Ghee or butter

Slice the tomato and place the slices on paper towels for about 30 minutes to absorb the excess liquid. Salt and pepper the slices to taste. Place layers of cheese on a slice of the bread. Top with tomato slices, then more cheddar. Top with the other slice of bread. Spread some ghee on the outside of the bread, then place ghee side down in an iron skillet with has been preheated. Before turning the sandwich, spread the other slice of bread with ghee or butter.


Sunday, August 21, 2011

Baba Ganouj


Baba Ganouj is a Middle Eastern dip or spread made from roasted eggplant, tahini, lemon juice, and olive oil.  It may not be the loveliest of dishes, but it sure is packed with flavor.  I dare you to take a bite without moaning. 

Eggplant is in season which translates into fresh, abundant, and affordable. I've already made several eggplant based meals and will be posting about them when I get the opportunity.  Eggplant is a very good source of dietary fiber, potassium, manganese, copper and thiamin (vitamin B1). It is also a good source of vitamin B6, folate, magnesium and niacin. For an in-depth nutritional profile click here: Eggplant.

This is another recipe from one of my old hippie cookbooks, Moosewood Cookbook by Mollie Katzen. Mollie says the recipe makes enough to fill six people who are dipping vegetables and bread into it, and calling it Dinner. I roasted the eggplant one evening and finished the recipe the next day.

Baba Ganouj
(Moosewood Cookbook)
2 medium eggplants
Juice from one good-sized lemon
1/2 cup tahini
3 medium cloves garlic, crushed
1/2 cup finely chopped parsley
1 tsp. salt
1/4 cup finely minced scallions
lost of fresh black pepper
1 Tbsp. olive oil

Preheat oven to 400 degrees. Cut off the stem end of the eggplants, and prick them all over with a fork. Place them on an oven rack directly, and let them roast slowly until completely pooped (about 45 minutes). When they are sagging, wrinkled, crumpled and totally soft, you'll know they're ready.  Remove them gingerly from the oven, and wait until cool enough to handle. Scoop the insides out and mash well.  Combine with all other ingredients, except olive oil.  Chill the Gajouj completely, and drizzle the oil over the top just before serving.


Thursday, August 11, 2011

Bread and Butter Pickles (with a Kick!)


My new co-worker, Joy, must have a fabulous garden. She has been bringing in freshly picked vegetables to share.  I have already enjoyed some beautiful and delicious green beans and squash.  Last week she brought a big basket of cucumbers. I took some of those and they were delicious. A couple days later, she brought in more cucumbers, and the first ones weren't even all taken.  By the end of the week, she asked if I would like to take all that was left. Of course I did. I never want to see food wasted, and especially garden fresh vegetables. 

Once home with all those cucumbers, I knew there was only one thing to do . . . make pickles.  I made quick pickles, Bread and Butter pickles, the recipe from Mother Earth News.  I adapted it slightly, cutting back on the sugar and adding some red pepper flakes. 

The recipe calls for covering the cucumbers in ice and refrigerating for 4 hours.  Because I was juggling all sorts of things needing attention over the weekend, mine stayed in the fridge overnight. No problem, they were perfectly crisp the next morning. 

There is no processing here;  no heating up the kitchen.  This is a refrigerator pickle.  The recipe given is for 6 pints of pickles. Because refrigerator space is precious real estate in my kitchen, I chose to use quart jars instead. 

I'm a little crazy about these pickles!

Bread and Butter Pickles (with a Kick)
adapted from Mother Earth News
5 pounds 5 - 6 inch pickling cucumbers
6 cups thinly sliced Vidalia onion
1/2 cup salt
Ice
4 cups white vinegar
2 cups sugar
2 Tbsp. mustard seed
1 tsp. celery seed
1 Tbsp. turmeric
1/2 tsp. (or more) red pepper flakes, optional

Wash the cucumbers well. Cut off 1/4 inch from the blossom end and discard. Slice cucumbers into 1/4 inch slices.  In a large bowl, combine sliced cucumber, onions, and salt  Toss gently and cover with a 2 inch layer of ice. Refrigerate at least 4 hours, up to overnight, adding more ice as needed.

In a large stockpot, combine vinegar, sugar, mustard seed, celery seed, and turmeric. Bring to a boil, and continue boiling for 5 minutes.  Drain the cucumber onion mixture, then add to the hot vinegar.  Bring to a boil, then turn off heat. 

Fill clean jars with the cucumbers and onions, leaving 1/2 inch space at top of jar.  Carefully, pour hot vinegar mixture over cucumbers, leaving 1/2 inch space at top of jar.  Run a knife along the sides of the jars to remove any air bubbles. Wipe down the jar rim wipe a wet cloth and add lids. 

The recipe recommends letting the flavors develop for 7 days before eating. We were tearing into them right away!


Sunday, August 7, 2011

Sunday Brunch: Eggs in a Cloud


You know those cookbooks put together by churches, charitable organizations, and auxiliaries as fund-raisers? I have amassed quite a few of them over the years and I have found some delicious recipes in their pages. It seems the contributors submit their best, tried and true and most popular recipes.

Last weekend, when Baby was here, she pulled one of these cookbooks off the shelf. Later, when I picked it up, I thumbed through it before placing it back on the bookshelf. This recipe jumped out at me.

The book has to be at least 40 years old and is from a church in Alabama.  The contributor of the recipe, Mrs. Arnice Ingram, calls these eggs, Breakfast Appetizer. I don't know why, because it becomes obvious that this is a part of the regular breakfast plate. 

I am giving the recipe exactly as it appears in the book.  Of course these could be made more elegant and lovely by piping the egg whites, and I thought about it. But Mrs. Ingram said  "spoon"  them in the pan, so I went with that.

BREAKFAST APPETIZER - Mrs. Arnice Ingram
1 or 2 eggs for each plate; separate yolks without breaking. Whip whites until stiff. Use smooth pan or iron skillet. Grease well with bacon grease. Spoon egg whites in pan in pancake order, making nest in top of each. Spoon a yolk into each nest. Have oven hot; do not put in oven until plates are ready with other breakfast food. Salt and pepper to suit taste; set in oven and cook done or soft, as desired. Serve hot only.


 I am sharing this with my friend, Melynda at Mom's Sunday Cafe for Coookbook Sunday

Friday, August 5, 2011

Aubergine with Crushed Mustard Seeds and Yoghurt

Curry-Palooza #5


Margie chose the recipe for this month's Curry-Palooza project and you can see the recipe here.  The recipe is another from Madjur Jaffrey, found at  My Kitchen Table.

This was actually the second time I made the recipe. First time, I had a couple of problems. One involved removing the cover, turning up the heat, and cooking off most of the liquid. By the time that happened, the eggplant was practically mush. The next problem involved the yogurt step. When I opened the top of the Greek yogurt, I was hit by the fragrance of strawberries!  Buying strawberry yogurt rather than plain was not the only grocery shopping mistake I made that weekend.  (New job on my mind). I wound up adding some half and half for the creamy aspect. 

I think I did better the second time, although it is still not a pretty dish.  I left it saucier because I was serving it over Basmati rice, plus I didn't want the eggplant to break down so much like it did the first time. 

This recipe is very different from any curry I have ever eaten.  My understanding is that it is an East Indian recipe using a common Bengali spice mixture, panchphoran, which consists of equal parts fennel seeds, mustard seeds, fenugreek seeds, and nigella seeds.  I ordered the spice mixture because the only ingredient I could buy locally was the mustard seed. 

We loved the complex yet mild flavor of this dish.  I especially enjoyed the pleasant crunch on my teeth from the seeds.

Curry-Palooza is a monthly event which explores Indian curries. We are having a lot of fun with this event and take turns choosing recipes. which can be from any source--magazine, cookbook, blog, or other. We would love to have you cook along with us. Canille will be choosing the next recipe and you could be the next--just let us know and you're in!

Curry-Palooza Club
Me, Sage Trifle
Grapefruit, Needful Things
Margie, More Please
Camille, Croque-Camille