Showing posts with label Cheese. Show all posts

Wednesday, January 31, 2018

Pineapple Puff Pastry Pinwheels With Cheese and Ham


PUFF PASTRY PINWHEELS ARE SUPER SIMPLE to make, yet look so fancy and fussy. They are perfect for parties and get togethers.

I usually buy frozen puff pastry which I find to be rather expensive, and the price kept me from using it as often as I would have liked.  Recently, I discovered a new item at my grocery store; a refrigerated puff pastry which was much more reasonably priced and didn't require thawing (aka planning ahead).

I made these pinwheels with pineapple, cheese, and ham. I have always loved the taste of pineapple and cheese together. I used to eat pineapple and cheese sandwiches as a girl. I love that glorious baked pineapple casserole.

Once I made these, I discovered the new puff pastry performed perfectly--many flaky layers and delicious taste. And oh so easy to use. It even comes with its own parchment paper for baking.

I will be making more of these pinwheels and have many ideas about how to fill them.

  • sun dried tomato cream cheese and turkey
  • cream cheese and pimiento stuffed olives
  • spinach, artichoke, and Parmesan
  • cheddar, pimiento, and pecan
  • pizza sauce, basil, and mozzarella
  • pesto, spinach, and feta
  • mango chutney and aged English cheddar


Pineapple Puff Pastry Pinwheels with Cheese and Ham

1 sheet puff pastry
1 cup fresh pineapple, finely chopped
8 ounces sharp cheddar cheese, shredded
8 ounces your favorite deli sliced ham, finely chopped

Preheat oven to 425 degrees

Unroll pastry sheet on a floured surface. Spread pineapple evenly over the pastry, followed by the shredded cheese, then the chopped ham. Roll into a log started from one of the long sides. Using a serrated knife, slice into 12 pieces. Place on parchment lined sheet pan, cut side up.

Bake 20 - 30 minutes until golden.


Wednesday, April 6, 2016

Classic Homemade Pimiento Cheese


THE AUGUSTA NATIONAL GOLF CLUB in beautiful Augusta, Georgia is hosting the most prestigious tournament in the U.S., The Masters, this week. My husband and I are not golfers but we have family that are crazy about the game. And we have family living in Augusta, including 4-year-old twin boys, Twin A and Twin B (as they were labeled on their ultrasound).


A & B at their first Masters


The Masters is famous for their food, especially the egg salad and pimiento cheese sandwiches, which at $1.50 each are cheap. At least something about the Masters is cheap. When we were in Augusta last month for the twin's 4th birthday, we paid about $100 per night for our hotel room. For that same hotel, during the Masters, the rooms start at $650 per night with a 4 night minimum.


Twin B "enjoying" an egg salad sandwich?


The chips seem to be a bigger hit


In honor of A & B's first Masters, I decided to make Pimiento Cheese, which like all Southerners, I love.

There are many variations on this humble spread. Everyone seems agree with the three main ingredients; cheese, mayonnaise, and pimiento. Then differences kick in. All types of cheese can be considered. The texture is up for much debate. Some use a mixer or blender to achieve a completely smooth product. More mayonnaise or less? Cream cheese? Then there are add-ins, onion, Worcestershire sauce, olives, jalapeno peppers, the list goes on.


Although I will tamper with the ingredients, depending on what I have on hand, I remain, for the most part, a purist. I don't enjoy mayonnaise, so I use as little as possible, and include the pimiento juice, along with some mustard for extra moisture. I insist that for the best finished product, good quality, extra sharp cheddar cheese must be used, and must be hand grated. If you have the cheese at room temperature before grating, you can get a better idea of the final texture, rather than working with cold cheese. I mix by hand, minimally, because I like the chunky, homemade look. If you want your Pimiento Cheese fluffier or creamier, go right ahead, add more mayonnaise and mix it more vigorously, it will still be delicious.


Classic Homemade Pimiento Cheese
16 oz. sharp cheddar cheese, grated
4 oz. jar chopped pimiento, undrained
1 Tbsp. dijon mustard
1/4 c. to 1/2 c. good quality mayonnaise
Freshly ground black pepper or cayenne, to taste


Mix all ingredients together until desired consistency, starting with the lesser amount of mayonnaise.


A & B watching the putters

Wednesday, January 27, 2016

Pasta e Ceci


PASTA e CECI IS NOT A FANCY DISH and I probably would not serve it for a dinner party. It did, however, make a perfectly delicious, healthful, and easy weeknight supper packed with flavor from olive oil, onions, garlic, anchovies, plum tomatoes, and fresh rosemary.

Rosemary is one of my favorite herbs but I must admit I don't enjoy pine needles in my food. There are a couple of ways to avoid this, one is to wrap it in cheese cloth to be removed after cooking. I prefer to chop it very finely, always using fresh.

I hope you will use the anchovies; they add such an unrecognizable depth of flavor, never fishy.

I used the adorable and tiny acini de pepe but any small pasta will work just fine. I loved the appearance and texture of the miniature pasta with the chickpeas. Because the pasta is cooked in the same pot, right along with the beans, the starchy cooking liquid helps to form a sauce. Not to mention this is a one pot meal making cleanup easy.


Pasta e Ceci
1 Tbsp.olive oil
1 small onion, diced
2 cloves garlic, minced
4 - 6 anchovy fillets, chopped
4 plum tomatoes, peeled and chopped
3 springs fresh rosemary, or 2 tsp. finely chopped fresh rosemary
1 can chick peas, drained and rinsed
4 cups broth or spring water
6 - 8 oz. small pasta
Salt and pepper to taste

Warm olive oil over medium low heat. Stir in onion, garlic, and anchovies, cooking until anchovies are melted. Add chopped tomatoes and saute for 10 - 15 minutes, until the tomatoes are fully cooked.

Increase heat and add can of chick peas, the broth or spring water, salt to taste, along with the rosemary. Bring to a healthy simmer and stir in the pasta. Cook, stirring occasionally, until the pasta is cooked per the package, or taste.

When the pasta is done, spoon into warm bowls. Drizzle with a little olive oil, sprinkle with freshly cracked black pepper, and garnish with shavings of Parmiigiano Reggiano.


Friday, November 13, 2015

Monte Cristo Quesadillas


EACH YEAR AFTER THANKSGIVING, we make Monte Cristo sandwiches, using slices of turkey, ham, and Swiss cheese. The sandwiches are dipped in an egg mixture and cooked in a hot skillet, much like French toast. The sandwiches are then sprinkled with powdered sugar and served with cranberry sauce.

These Monte Cristo quesadillas are not made with Thanksgiving leftovers because I don't yet have any. But I did have some tortillas I wanted to use, left from making Pot Roast Quesadillas. I used deli sliced turkey, ham, and Swiss cheese and served them with homemade Strawberry Ginger Jam.

I did not dip these quesadillas in custard before cooking but I did consider it. . .


Monte Cristo Quesadillas
2 large tortillas
2 - 3 oz. sliced turkey
2 - 3 oz. sliced ham
2 - 3 oz. sliced Swiss cheese
Powdered sugar
Butter for pan

Layer turkey, ham, and cheese slices on one tortilla. Top with the other tortilla.

Heat a pat or two of butter in a heavy skillet over medium heat. Put the stacked tortillas into the skillet and cook until well browned then flip over and cook the other side until browned and the cheese is melted.

Remove from skillet and dust with powdered sugar. Cut into wedges and serve with berry jam or maple syrup.

Repeat steps for additional quesadillas..


Wednesday, October 14, 2015

Tex-Mex Migas


WHEN THE WEATHER IS CHILLY, GRAY, AND DAMP, I often want to eat something breakfasty. I started using the word, breakfasty, several years ago when I learned it from a little boy who had spent the night with us. Next morning, I asked him if he would rather have eggs or oatmeal. Nope, he wanted something breakfasty. Fruit? No, something breakfasty. I kept offering more and more options and he declined all of them, repeating that he wanted something breakfasty. Finally, I asked him what he considered breakfasty and he replied, "donuts". Apparently he had already spied the Krispy Kreme box I thought was out of sight on top of the refrigerator.

My idea of breakfasty is more on the savory, even spicy side.  Thus, Migas. My husband is never excited when he comes home and sees me making this dish for our supper. And I admit, it is not a show-stopper appearance wise. But he eats it with enthusiasm and growing appreciation and even goes back for seconds.

Migas is scrambled eggs with onions, peppers, leftover tortillas, and cheese. The recipe is very flexible, any kind of peppers can be used, crushed tortilla chips from a bag work fine, any cheese works. Everything is to taste. I like to use corn tortillas, skillet fried until crisp, poblano peppers, and Monterrey jack cheese.


Tex-Mex Migas
1/4 cup mild cooking oil
5 corn tortillas, cut into bite-sized pieces
1 small onion, chopped
2 - 3 poblano peppers, diced
1 tomato, peeled and chopped
8 eggs
2 Tbsp. milk
Salt and pepper to taste
1 cup shredded Monterrey jack cheese

Heat oil in a large skillet over medium-high heat. Toss the tortilla pieces in the hot oil, stirring constantly, for 2 to 3 minutes, until crispy. Remove to paper towels and set aside while you saute the onions and peppers, in the same skillet, for a couple of minutes. Stir in the tomatoes.

Meanwhile, whisk together the eggs, milk, salt, and pepper. Add to the onion mixture along with the tortilla pieces. Gently lift the vegetables and tortillas to let the eggs get evenly distributed.

When the eggs look nearly done, turn off the heat, sprinkle on the cheese and put a lid on it.

When the cheese is melted, serve with salsa, sour cream, avocado slices or guacamole.


Monday, September 7, 2015

Rosalynn Carter's Baked Eggplant


WHEN I FIRST SAW THIS RECIPE on Melynda's blog, Our Sunday Cafe, I knew I would make it. The first reason is that I love eggplant and they are in season. Secondly, I am a fan of former president Jimmy Carter and his beautiful wife, Rosalynn. Like most Southerners, the Carters love vegetables, but the eggplant is undoubtedly Jimmy Carter's favorite vegetable.

When we recently heard that President Carter had been diagnosed with cancer, I felt a bond with him on a completely different level. Besides his peace keeping missions, his food preferences, his dignity and courage, his charming  Southerness, when given a diagnosis of cancer, you inadvertently become a member of a club to which you had no desire to be a member. I have been a member of the club for about 3 years. To not leave anyone in mystery, here is a brief post I made about it back then.

Because this is a food blog, not a health blog, I give you the recipe. I hope you enjoy it as much as we did.


Rosalynn Carter's Baked Eggplant
1 large eggplant
Olive oil
Salt and pepper
1 cup chopped onion
2 cloves garlic, minced
2 large tomatoes, peeled and chopped
1/4 tsp. fresh thyme leaves
1/4 cup fresh parsley, chopped
1/2 cup fresh bread crumbs
1 cup grated Swiss cheese

Slice eggplant about 1/2-inch thick. Place on a rimmed baking pan, rub with olive oil, and sprinkle with salt and pepper. Broil until lightly browned and fork tender.

Meanwhile heat a small amount of olive oil in a skillet; add onion and cook until golden. Add garlic and tomatoes, cooking until beginning to thicken. Stir in seasonings and bread crumbs.

Spread the tomato mixture over the broiled eggplant then cover with grated cheese. Bake at 350 degrees 15 minutes.


Friday, May 22, 2015

Baked Cheese Grits with Rotel Tomatoes


AS SOUTHERNERS, WE LOVE GRITS. I cook them often, in all sorts of ways. After I made this dish, I realized I had posted only one other grits recipe, ever, here on my blog. That was all the way back in 2009 when I posted Shrimp and Grits, an amazing and delicious recipe.

You know Ro*Tel tomatoes, right? The cans of diced tomatoes with green chilies? They have been around forever, have the perfect amount of heat, and are delicious to use in so many ways. They are a pantry staple in my kitchen.

The other day, I was shopping at the gigantic grocery store, with Rotel tomatoes on my list. On the shelf I saw there are now 6 different types of Rotel tomatoes. Arrgh! Marketing strikes again. I don't mean to beat up on Rotel tomatoes; I love them. But it is the same thing with everything on my list. For every item, I have too many decisions to make. This is why the stores are so huge and shopping takes so long. On some levels choices are good but I don't always want to walk the equivalent of a city block and comb through undesired products, when I only have 8 items on my list.


Baked Cheese Grits with Rotel Tomatoes
2 cups water
1 1/4 cups milk
1 tsp. salt
1 cup stone ground grits
1/2 cup butter
1/3 cup scallions, sliced
1/4 cup Velveeta, cubed
2 1/2 cups cheddar cheese, shredded, divided
1 (14 oz.) can Rotel tomatoes

Preheat oven to 350 degrees. Grease a 9 x 9 inch baking dish.

In a saucepan, bring the water and milk to a boil. Add the salt and slowly add the grits and return to a boil, stirring constantly for 1 minute. Reduce heat, cover, and cook for 20 minutes, stirring occasionally.

When grits are thickened, stir in the butter, scallions, Velveeta and 2 cups shredded cheddar. Stir until cheese is melted then stir in the tomatoes, mixing well. Pour grits into prepared dish and bake for 35 minutes. Sprinkle on the remaining cheddar and bake 5 minutes more.

Remove from oven and let it sit for 10 minutes before serving.


Wednesday, May 13, 2015

Quiche Lorraine


QUICHE LORRAINE IS NAMED FOR the Lorraine region of France.  I am not an expert on France, French cooking, and especially the French language. From growing up in the south, I learned that trying to speak French words with a southern accent just does not work. But I can pronounce Quiche Lorraine. And so could the B-52's. In fact their song about a French poodle named  Quiche Lorraine jumped into my head while I was making this.

Variations on the recipe are many, of course. I used what I had on hand including fresh chives which are growing abundantly in our border garden.

I made Pastry Brisee for the crust, a very buttery, crumbly crust, which was practically shortbread. It was perfect with this savory, cheesy pie. I usually rely on the convenience of those rolled up pre-made crusts in the red box but I didn't have any. I weighed my options and decided it would be easier to make pastry than drive to the store to buy it.


Pastry Brisee
2 cups flour
pinch of salt
1 Tbsp. sugar
2/3 cup butter (10 Tbsp. + 2 tsp)

Whisk together the flour, salt, and sugar. Cut in or rub in butter until the mixture resembles coarse sand. Work into a ball, wrap, and refrigerate for 1 hour.

The pastry is too crumbly for rolling out, so press it into a buttered pie plate with your fingers until you have a smooth crust of even thickness. Finish edges as desired. Prick the bottom with a fork and bake for 10 minutes at 450 degrees.

Quiche Lorraine
1 pie crust
5 slices bacon
8 oz. Swiss or Gruyere cheese
4 eggs
1 cup creme fraiche
1 cup milk
2 Tbsp. fresh chives, thinly sliced
small grating of nutmeg
salt and pepper to taste

Prepare pastry brisee as above or if using a pre-made crust, prick it with a fork and bake for 5 minutes only at 450 degrees.

Cut bacon into 1-inch pieces and cook in a small skillet over medium-high heat until crispy. Drain on paper towels.

Cut cheese into small cubes.

In a mixing bowl whisk the eggs until well blended. Add the creme fraiche and milk and whisk until smooth. Stir in the chives, nutmeg, and salt and pepper.

Place cheese cubes in bottom of partially baked crust. Sprinkle bacon over the cheese and then pour the egg mixture over all. Bake for 15 minutes at 450 degrees, then turn the oven down to 350 degrees and bake about another 10 to 15 minutes, until a knife inserted into the center comes out clean.


Wednesday, April 29, 2015

Spinach Enchiladas


WE LOVE TEX-MEX,  but it seems that most of our local Mexican Restaurants have moved to more of a California style of Mexican cooking. I suppose it is more on-trend and I understand why. Cal-Mex seems to be lighter with more of a focus on seafood and fresh vegetables, whole beans rather than refried, and lots of cilantro which is an herb I don't enjoy.

The tortillas are another thing. Tex-Mex tacos and enchiladas are made with corn tortillas, whereas the Cal-Mex style uses flour tortillas, another thing I do not enjoy.

We recently went to one of our (formerly) favorite Mexican Restaurants. I ordered spinach enchiladas, which I had enjoyed in this restaurant many times over the years. Imagine my disappointment when the plate presented to me (with the standard warning of: hot!) contained a couple of "spinach roll-ups" with flour tortillas, no sauce, no melted gooey cheese. That was not an enchilada, rather more like a burrito.

We haven't been to that restaurant again--sigh--and I decided to make Spinach Enchiladas at home.


Spinach Enchiladas
1 Tbsp. butter
1 bunch sliced scallions
2 cloves garlic, minced
12 oz. fresh curly spinach, steamed until barely tender, then squeezed dry
1 cup queso blanco (may substitute ricotta or cottage cheese)
1/2 cup sour cream
2 cups shredded Montrey Jack cheese
10 (6-inch) corn tortillas
18 oz. enchilada sauce

Melt butter over medium heat. Add garlic and scallions and cook for a few minutes until fragrant, but not brown. Stir in spinach and cook a few minutes longer. Remove from heat and mix in the queso blanco, sour cream, and 1 cup of the Monterrey Jack.

Warm the tortillas, a few at a time, wrapped in damp paper towels, for about 30 seconds in the microwave. Spoon about 1/4 cup of spinach mixture onto the center of each tortilla. Roll up and place, seam side down, in a 13x9 inch baking dish. Pour the enchilada sauce over the top, and top with the remaining 1 cup of Monterey Jack cheese.

Bake for 15 to 20 minutes in a preheated 375 degree oven, until the sauce is bubbly and the cheese is melted and beginning to brown.


Wednesday, April 1, 2015

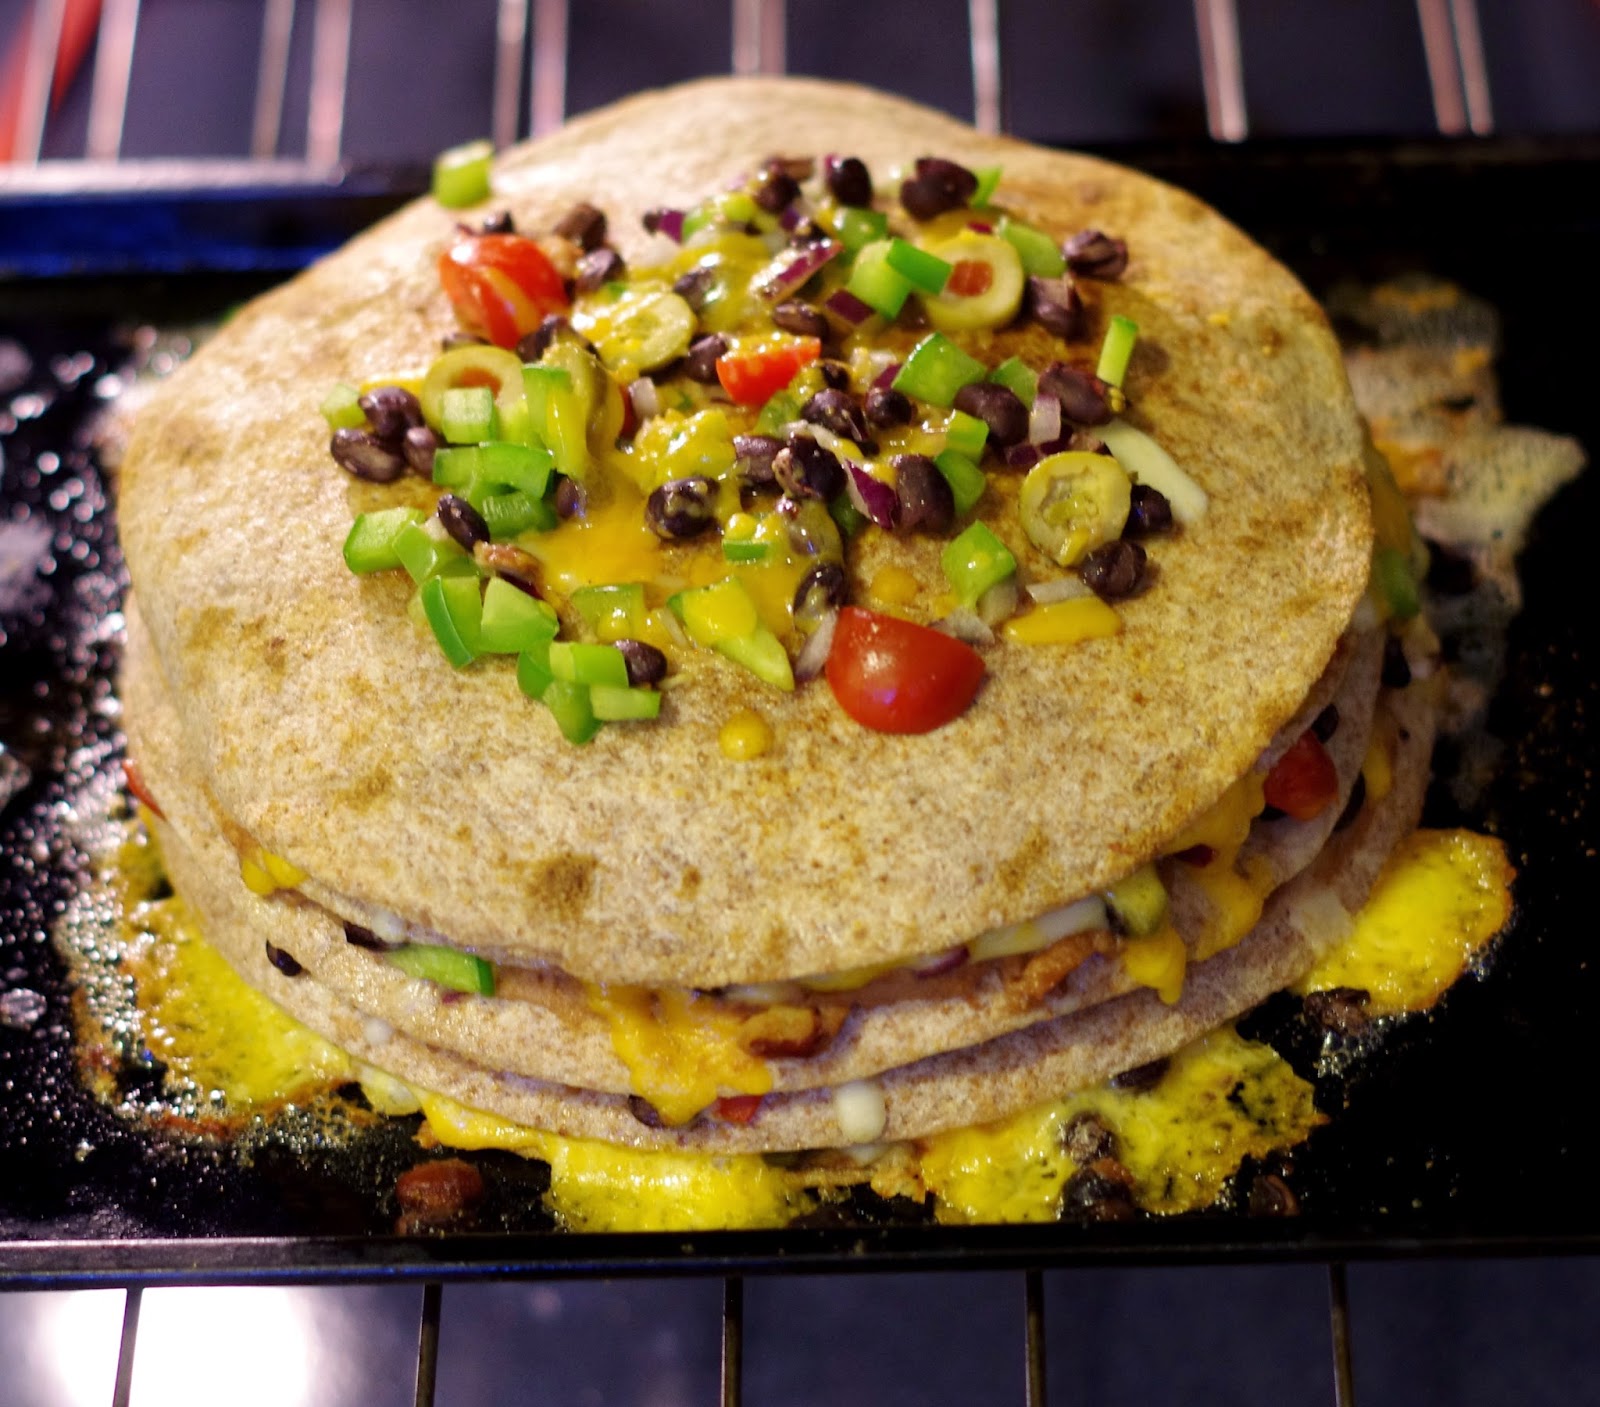
Stacked Tortilla Pie


THE ENTIRE TIME I WAS WORKING OUT yesterday, I was thinking about food. Not that I was hungry; I'd had a good protein packed smoothie before I went to the gym. But I knew I would stop by the grocery store on my way home and I needed to decide what to make for dinner. I wanted something simple and healthful. As I was working on my gluteus maximus, this tortilla pie came to mind.


I have seen variations of this and Rosie Hawthorne's has always appealed to me most. I like that she doesn't cook or saute her vegetables before assembly. Now is the time of year I crave a little crunch in my life after all those winter soups and stews.


 I have always thought Rosie's use of butter and her baking directions sounded just right.


Rosie adds corn to her pie but I don't because Pritchard Parker doesn't want to eat it. Instead, I used two different types of beans--black beans and refried beans.


Stacked Tortilla Pie
(adapted from Kitchens are Monkey Business)
1 can black beans, rinsed and drained
1 can refried beans
1 cup chopped red onion
1 cup chopped green bell pepper
1 cup chopped tomato
1/2 cup sliced pimiento stuffed olives
2 cups shredded sharp cheddar cheese
2 cups shredded Monteray Jack cheese
2 Tbsp. melted butter
Extra large whole wheat tortillas
Ground cumin and cayenne pepper to taste

Preheat oven to 325 degrees and butter a sheet pan.

Mix together the black beans, onion, bell pepper, tomato, and olives.

Spread refried beans on one tortilla and place on prepared sheet pan. Spread some of the vegetable mixture over the beans and then sprinkle on some of each cheese. Repeat, leaving a bit of vegetables and cheese for the top.

Brush melted butter on the edges of the tortillas and all over the top one. Sprinkle with cayenne pepper and cumin to taste. Add the remaining vegetable mixture and cheese to the top.

Bake 20 - 30 minutes until golden and the cheese is melted. Let sit 15 minutes before serving.

Serve with choice of salsa, sour cream, guacamole, crumbled caso blanco.


Wednesday, January 21, 2015

Cheesy Garlic Butter and Angel Biscuits


OUR RESIDENT FIVE-YEAR-OLD, loves helping me in the kitchen. She especially likes baking. Because she was out of school Monday, for Martin Luther King Day, I thought it would be a perfect day to make a batch of Angel Biscuits. We were having a Tomato Soup for dinner and I thought the biscuits would be delicious with it.

Especially with the Cheesy Garlic Butter we made. My blogging friend Melynda, from Our Sunday Cafe, recently posted a recipe which originated in a now closed but once popular restaurant in Portland, Oregon. I adapted the recipe to our tastes.

We have eaten all the biscuits, but we still have some of the cheesy garlic butter. Tonight, we will be having some on French Bread.


Cheesy Garlic Butter
1 cup (2 sticks) salted butter
8 oz. extra sharp cheddar cheese, freshly grated
1 clove garlic, minced
1/4 tsp. (more to taste) cayenne pepper

Have cheese and butter at room temperature. Beat all ingredients with a mixer, beginning at low speed and increasing speed, until the mixture is light and fluffy.


Angel Biscuits
2 1/2 cups all purpose flour
2 Tbsp. sugar
1/2 tsp. baking powder
1/2 tsp. salt
1/2 cup shortening
1 packet yeast, dissolved in 1/4 cup warm water
3/4 cup warm buttermilk

Combine all dry ingredients in a large bowl. Cut in shortening until the mixture resembles coarse crumbs. Add yeast mixture and buttermilk; stir to combine. Turn onto a floured surface and fold the dough over itself a few times until all is blended.

Roll out to 3/4 inch thickness, then cut into 2 1/2 inch biscuits. Place biscuits on a baking pan which has been spritzed with cooking spray. Cover and let rise for about 45 minutes.

Bake at 400 degrees for 15-20 minutes until done.

Note: Some cooks skip the rising step and put the biscuits directly into the oven after placing them in the pan. My grandfather could have done it that way, I don't know. I do know from experience, if you let yeast dough have plenty of time to rest and rise, you will be richly rewarded.


Tuesday, December 2, 2014

Savory and Sweet Pineapple Cheese Ball


CHEESEBALL. HAVE YOU EVER CALLED SOMEONE THAT or gasp, been called a cheeseball yourself? Silly, corny, cheesy, goofy.

I think of the Cheese Ball itself to be rather cheesy--middle brow, 1960's suburbia cocktail party,

Be that as it may, I love cheese balls. There are so many varieties and they beckon fun and creativity. Shapes can be altered, cheeses varied, decoration ideas are endless. Try forming one into a cone and roll in chopped parsley to make a Christmas tree, which can be decorated with roasted red pepper and green olives. How about one with smoked salmon, formed into a fish shape with sliced almonds for scales. Or make one with blue cheese, roll in walnuts and serve with pear slices. Try rolling your ball in smoked paprika or coarsely ground black pepper.

This is my favorite cheese ball. I adore the flavor combination of sharp cheddar cheese and pineapple. The red bell pepper and scallions add dimension and the crunch of the toasted sliced almonds gives the perfect bite.

With crackers and crudites, I could happily eat this as a meal.


Savory and Sweet Pineapple Cheese Ball
8 ounces cream cheese, room temperature
8 ounces sharp cheddar cheese, grated, room temperature
1/4 cup finely chopped red bell pepper
2 - 3 scallions, sliced
1 cup chopped, fresh pineapple (or canned, unsweetened)
1/4 tsp. (or more to taste) cayenne pepper
1 1/2 cups toasted, sliced almonds

Beat the cream cheese, cheddar cheese, bell pepper, scallions, pineapple, and cayenne until blended. Cover and refrigerate for 30 minutes. Shape into a ball; roll in sliced almonds. Cover and refrigerate for several hours or overnight. Serve with crackers and crudites.


Tuesday, November 4, 2014

Muffuletta Sandwich for a Fall Picnic


THE BLUE RIDGE PARKWAY is scenic highway which runs from the boundary between The Great Smoky Mountains National Park and the Cherokee Indian Reservation in North Carolina to The Shenandoah National Park in Virginia.

The Parkway is a product of the New Deal's efforts to provide jobs to the unemployed during the Great Depression of the 1930's. Construction began in September, 1935, took 52 years to complete, and runs for 469 miles.

The Blue Ridge Parkway is my favorite part of living where we do. While driving the parkway, you encounter 26 mostly hand dug tunnels which were designed to reduce excessive landscape scarring. They are so beautiful! You will encounter old farmsteads, an old grist mill, hiking trails, waterfalls, scenic overlooks to park and take in the beauty. You might see a bear, fox, coyote, skunk or another animal. What you will not see are power lines, traffic lights, billboards, or any other sign of commercialism. It is a two-lane highway and the speed limit is never more than 45 mph.


Lucky for us, there is an entrance to the Parkway just about 5 miles from our home. We have taken a few drives in the past couple of weeks to enjoy the glorious fall colors. This has been an especially brilliant fall.


I am not equipped to photograph the sweeping and breath-takingly beautiful mountain vistas, but I recently packed a picnic and shot some photos around a picnic area where we lunched. It was a glorious day. The skies were brilliant blue with fluffy white clouds floating about. The air was crisp but quite warm in the sun.


I made Muffuletta sandwiches because they are delicious and travel well.


Muffuletta Sandwich
1 round loaf Italian bread
1/4 pound each thinly sliced:
   Genoa salami
   Cooked ham
   Mortadella
   Mozzarella cheese
   Provolone cheese
Olive Salad:
   1 jar Giadeniera, chopped
   1 1/2 cups pimiento stuffed olives, chopped
   3 - 4 cloves garlic, crushed
   1 Tbsp. chopped fresh oregano
   1/2 tsp. crushed red pepper flakes
   Freshly ground black pepper, to taste
   1/4 to 1/2 cup olive oil

Combine the olive salad ingredients and stir well. Cover and refrigerate for several hours. Stir well again before applying to the sandwich.

Cut the bread in half around the horizon. Tear away some of the fluffy interior to hollow out the bread a bit. (Save to use for bread crumbs later).

Generously spread olive salad on each half of the sandwich. Layer the meats and cheese. Close the sandwich and press down. Wrap tightly and refrigerate until later or serve right away, cut into wedges.

Leftover sandwich wedges and leftover olive salad keep well.