Sunday, July 24, 2011

Rose of Sharon


Yes, this is a food blog and I don't steer off course often, but I wanted to show off the three colors of Rose of Sharon we have growing in our backyard. These are courtesy of a former owner of our house.  I don't know who they were, but I thank them. What a lovely gift. 


I also want to tell you that I have accepted a fulltime job outside our home. This will be the first time I have held a fulltime job in three years.  Why am I telling you this? Because it will, inevitably, effect my blogging. No longer will I have the bonus time to sit around and imagine.

I have, and will, continue to cook and photograph. It is the actual blogging aspect I haven't quite figured out yet. But I will.  I love this little corner of the internet I have created. 


When I was a little girl, my Grandmother showed me how to make a little doll using these flowers. I would make a line-up of them and play for hours. They would dance and sing and parade around and pose.  Every summer, I make at least one, in remembrance of her. 


"I am the Rose of Sharon, and the lily of the valleys."

Song of Solomon 2:1


Sunday, July 17, 2011

Radish Sandwiches with Anchovy Butter


I have been intrigued by the concept of serving radishes, which I love, with bread and butter. However, I had never tried it.  When I saw this recipe in the April issue of Bon Appetit, which ups the ante by making the sandwiches with anchovy butter, I made a mental note. 


When I saw these beautiful radishes in the produce department of my regular grocery store, it was time to try the recipe.  We really go for anchovies. Plus the recipe calls for chives, and we happen to have some prime garlic chives growing right outside the kitchen door.

Radish Sandwiches with Anchovy Butter
(Bon Appetit)
1 stick butter, room temperature
2 - 3 anchovy fillets, finely chopped
2 Tbsp. chopped fresh chives
Baguette slices
Sliced radishes

Mix butter, chopped anchovy fillets, and chives in a small bowl. Season with coarse sea salt and freshly ground black pepper to taste.  Spread anchovy butter over each baguette slice. Top each with radish slices, overlapping slightly to cover the bread. Garnish with additional chopped chives. 


I was delighted with these little sandwiches! They tasted so much better than the sum of their parts and were quite satisfying.  I used some of the leftover anchovy butter on baked potatoes and that was also delicious.

Tuesday, July 12, 2011

Homemade Blue Cheese Dressing


Homemade is always better. One of the reasons I insist on making food from scratch is the fact that it gives me something I can control. There are so many things going on in the world over which I am powerless. But I can, and do control what I eat and what I feed to the people I love. 

Making homemade salad dressing is not difficult at all. Not only does it taste so-ooo-o much better and fresher, you have the added bonus of avoiding ingredients like high fructose corn syrup, partially hydrogenated oils, artificial flavorings and colors, propylene glycol, polysorbate, xanthum gum, and even EDTA (yikes!) as a preservative.  Even if these ingredients are "safe", what cook has such items on hand to add to their food? 


When I was a girl helping my Mother in the kitchen, one of my jobs was making the salad. Mama, who is an incredible cook, and who loves a good salad, just does not like making them. I have known other people who feel the same way. And from the looks of the bagged salads in the produce department an entire industry has been built upon those sentiments. I have been on my soapbox before about bagged lettuces, so I will skip that rant for now.

When it is too hot to cook, I make a lot of fresh salads to serve as the main dish, with maybe a sandwich on the side, or a cold soup.  I take just as much care making salads as I do with any other dish.  I find the handling and washing all the fresh ingredients to be very pleasant. Maybe because my Mother praised me so much for the beautiful salads I made? 

I just made a salad with baby romaine lettuce from our next door neighbor's garden, a Kirby cucumber from my Mother-in-law's garden, thinly sliced red onion, fresh cherries, toasted pecans, homemade croutons, and served it with homemade blue cheese dressing. 


Blue Cheese Dressing
1 large garlic clove, minced and mashed to a paste with 1/4 tsp. salt
1 Tbsp. Dijon mustard
2 Tbsp. fresh lemon juice
2 Tbsp. white wine vinegar
1/3 cup olive oil
1/3 cup sour cream
3/4 cup crumbled blue cheese (more to taste)

In a blender, blend together the garlic paste, mustard, lemon juice, vinegar, along with salt and pepper to taste.  With the motor running, add the oil and blend the mixture until it is combined well.  Add the sour cream, the cheese, and 2 Tbsp. water, or enough to obtain the desired consistency.  Blend the dressing until it is combined well, then transfer to a bowl.  Stir in additional crumbled cheese, if desired, and correct seasonings.

Saturday, July 9, 2011

Hobo Dinner


I was a Girl Scout Extrodinaire. Of course, I could not have been without the dedication of our Leaders and the bonds formed with the other girls in my troop. We had 3 leaders and 18 girls that went from Brownies, to Girl Scouts, to Cadettes, to Senior Scouts. Everyone in our troop earned the equivalent of the Boy Scout Eagle.  We earned every badge in the Girl Scout Handbook. 

We did a lot of wilderness camping, built a lot of campfires, told so many ghost stories we were too scared to sleep while out in the middle of the woods. We always pitched and trenched our tents and in most places, dug our own latrines. Almost every member of our troop was also in the glee club, so we sang some beautiful campfire songs. 

We gathered our own firewood--tender, kindling, and fuel, then cooked delicious food over the campfire. Anyone who has spent much time outdoors, knows what an appetite occurs and how totally delicious everything cooked in the open tastes. 

We used to make these Hobo Dinners and I still love them. Of course I have such beautiful memories attached.

Hobo Dinner
Sheets of foil
1/4 lb. ground beef
Several slices onion
Slices of potato
Sliced carrot
Salt and pepper

Wrap packets up tightly and cook on hot coals of a campfire until done.  Serve with ketchup.


Girl Scouting builds girls of courage, confidence, and character, who make the world a better place.


Thursday, July 7, 2011

Mixed Grill


We eat meals like this a lot in the summer. It may not look exciting, but there is plenty of flavor and texture here, and this made a perfectly delicious and satisfying meal for our 4th of July picnic for 2. 

When we cook like this, I do all the kitchen prep and Pritchard Parker is the master of the grill. 

Here, I started with the ribs, trimming them and cutting into serving size portions. Next, I coated the portions with my favorite spice rub for pork and let them marinate for about an hour.  Afterwards I cooked the ribs for 10 minutes on the steamer rack of the pressure cooker.  Once they were ready for the grill, they were technically "done", though quite unappealing looking. Finishing on the grill made them perfect.


While the meat was marinating, I worked on the vegetables, which were zucchini, Vidalia onions, corn on the cob, asparagus, and new potatoes. The zucchini were cut in half length wise and drizzled with rice vinegar and toasted sesame oil. The Vidalia onions were cut into thick slabs, skewered, then topped with a bit of honey and cayenne pepper. I skewered the asparagus to make little rafts, which I then drizzled with olive oil, squeezed on some lemon juice, and salt and pepper. For the corn, olive oil, salt and pepper. 


The potatoes were also drizzled with olive oil in addition to finely chopped fresh rosemary, coarse sea salt, and freshly ground black pepper.


First, Pritchard Parker cooked all the vegetables. Then the meat and potatoes.


We served the ribs with Eastern North Carolina Barbecue Sauce.


Sunday, July 3, 2011

Pound Cake Memories (A Re-post from Sunday, July 5, 2009)

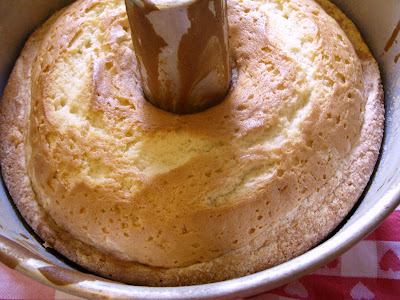
There was a time when the aroma of a pound cake, baking in my oven on the 4th of July would have made me sad, and very homesick. Yesterday, I cherished the memories. I had been thinking about pound cake a while, longing for it, really. Then the time came to make one.

I turned to the first cookbook I ever had, a church one, with local ladies' recipes, given to me by the minister. There are 9 pound cake recipes in it, including sour cream pound cake, lemon pound cake, chocolate pound cake, marble pound cake, brown sugar pound cake, whipped cream pound cake, along with several icings, frostings, and glazes. I chose a buttermilk pound cake bacause I had all the ingredients on hand. Technically, I should call this a "Half Pound Cake".


Buttermilk Pound Cake
1 c. butter, room temperature
2 c. sugar
4 eggs, room temperature
1 c. buttermilk
1/2 tsp. baking soda
pinch salt
3 c. all purpose flour, sifted before measuring
1 Tbsp. vanilla

Generously butter and flour a tube pan, shaking out excess flour. Preheat oven to 350 degrees.

Cream together, the butter and sugar until pale, light, and fluffy. Mix in the eggs, one at a time.

Measure buttermilk and pour into a small bowl, then add the baking soda. It will become active and expand quicky, so make sure you have room. Think about those elementary school volcano experiments.

Add the salt to the sifted flour, then begin combining the buttermilk and the flour into the butter mixture, one third at a time, mixing well after each addition. When all is combined and mixed well, stir in the vanilla.


My grandmother did not have a KitchenAid mixer, and made the most beautiful cakes using only this hand beater. (Stamped onto the wheel of this beater are the words, "HIGH SPEED SUPER CENTER DRIVE BEATER. Ekco USA."


Thank goodness I have an electric hand mixer to help with my work.


Pour batter into the prepared pan and put into preheated oven. Bake for about 55-65 minutes until a toothpick comes out clean.


Cool in the pan for 15 minutes.


Pound cake is a good dessert for summer celebrations and family reunions, when many dishes are being served. It is delicious served with fresh summer fruit and homemade ice cream.

I am sharing this recipe with Cookbook Sunday, at Melynda's blog, Mom's Sunday Cafe

Friday, July 1, 2011

Cardamom and Black Pepper Chicken

Curry-Palooza #4


It's Curry-Palooza time again!  Grapefruit chose the recipe this month and broke our vegetarian trend by choosing a chicken recipe--Cardamom and Black Pepper Chicken. I was excited about the recipe because I love cardamom.  Margie will choose the next recipe and I look forward to seeing what she decides on. 

This is another Madhur Jaffrey recipe, and I followed it as precisely as I could. It turned out great! Alice and Baby had dinner with us and they loved it too. 

The recipe directions call for marinating the chicken for 30 minutes or up to 3 hours. I went closer to the 3 hour mark, while I prepped all the ingredients, and made other dishes to serve with the chicken.  It was a pleasant and aromatic afternoon in the kitchen.

 I've said  before, I am always fascinated by the way different cooks can start with the same recipe and the results turn out so differently.  One of many things to love about cooking. 

Here is Margie's Cardamom and Black Pepper Chicken. She served hers with a side of fresh snap peas from the farmers' market, as well as homemade naan. 

Camille, of Croque-Camille, joined us this month and here is her version of Cardamom and Black Pepper Chicken.

We are having fun with this event and would love to have you join us in Curry-Palooza, which is still a new project. As each person joins, they get to choose the recipe, in the order they join.  Just let me know, or let Grapefruit know. 

And check out Grapefruit's blog, Needful Things, for the recipe.

Cucumber and Mint Raita


Raita is a yogurt salad made with thick, whole-milk yogurt and various chopped vegetables. Typically used as a condiment, raitas are seasoned with various spices and herbs, and are designed as a cooling element to counterbalance many spicy Indian foods. 

I always have raita when dining in Indian restaurants and I always make it at home when I cook Indian food. I have eaten it and made it several ways. One raita I enjoyed very much was made with cucumber, scallions, tomatoes, and fresh dill. But the one I always go back to, is one made cucumber and mint. 

I also enjoy eating a dish of raita for breakfast, making a nice break from all the fruit-flavored choices available in supermarkets. 

Cucumber and Mint Raita
3 cups plain, whole milk yogurt
1 large cucumber
Fresh mint leaves
1/2 tsp. toasted, ground cumin
Pinch of cayenne
Salt and freshly ground black pepper, to taste

Pour yogurt into a mixing bowl. Peel, seed, and dice the cucumber and add to the bowl. Chop fresh mint leaves to equal about 1 Tbsp. and add to the bowl.  Mix all together and season with the cumin, cayenne, salt and pepper.  Cover and chill.